Final Cut Pro Plugins
Color Finale 2.2.8
Final Cut Pro PluginsUpdated
| Requirement | On file |
|---|---|
| macOS | macOS 10.12 or later |
| CPU | Intel 64-bit |
| Download | 35 MB |
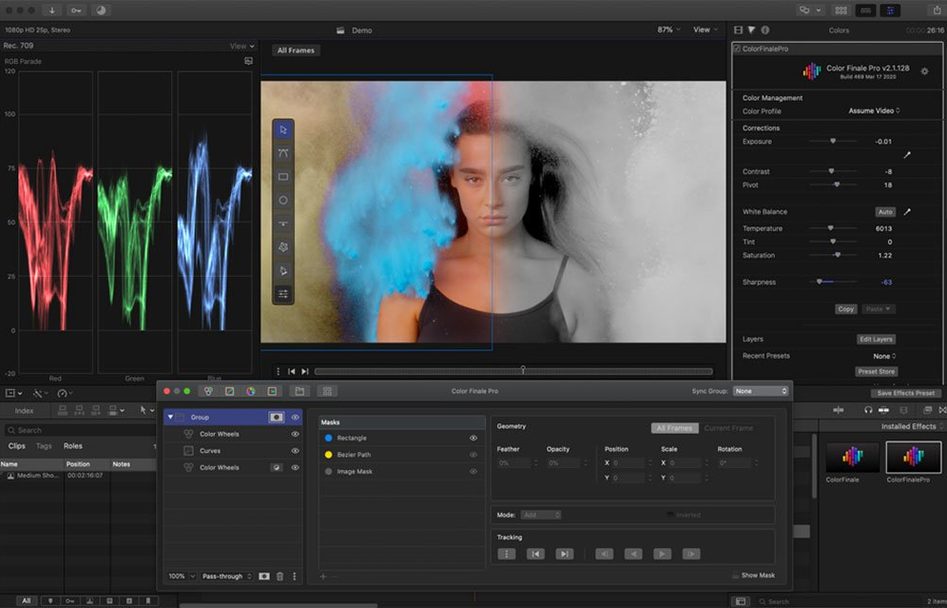
Lift, Gamma, Gain wheels sit at the centre of the control set — a deliberate choice that makes the initial balance feel closer to a dedicated grading panel than a typical NLE effect. From there the toolset fans out into territory Final Cut Pro’s built-in corrector never touches. Primary colour vectors give you hue-by-hue control over saturation and brightness without pulling a qualifier first, which keeps skin tones cleaner when you push a grade. The HSL curves section lets you shape luminance against saturation per hue, so a blue sky can be pulled darker without desaturating a teal shadow in the same range.
- Layered adjustments stack in the inspector, letting you build a look from multiple nodes — a base correction, a look LUT, then a curve trim — all inside one effect instance.
- 30 ASCEND presets ship with the plugin, covering film emulation and clean broadcast looks that load as editable starting points rather than baked-in filters.
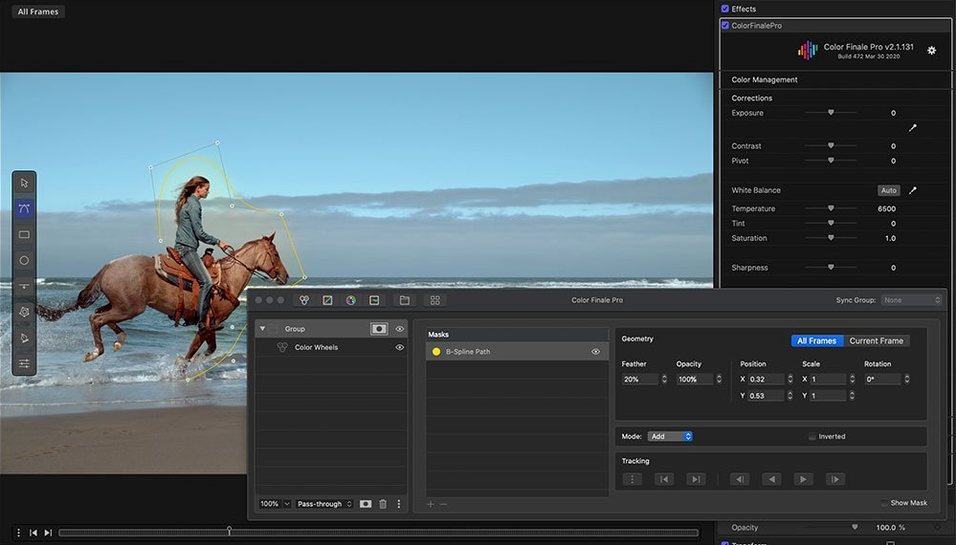
- The LUT authoring tool writes .cube files from your current grade, including masked adjustments, so a look built for one project ports directly into a monitor LUT box or another application.
- A Color Preset Store inside the interface saves and recalls complete setups — wheels, curves, vectors and mask states — without leaving Final Cut Pro.
- HSL curves operate on hue, saturation and luminance axes simultaneously, which compresses what would normally take three separate tools into one graph.
The plugin lands as a video effect inside Final Cut Pro and Motion, but relies on a separate Color Finale application installed in the Applications folder to handle its macOS framework calls. That split architecture means the effect itself stays light inside the host while the heavy processing runs externally. Interface language support covers English and Simplified Chinese.
The Silent Grey Preview Permission Trap
First launch after installation trips some users because the Color Finale application silently waits for permission to access the screen and files. macOS won't always prompt for this — sometimes the effect simply shows a grey preview in Final Cut Pro with no obvious error. Opening System Preferences → Security & Privacy → Privacy and granting Screen Recording and Files and Folders access to the Color Finale app usually fixes it within seconds.
Another recurring hitch involves the separate application structure. If you drag only the plug-in into Final Cut Pro's effects folder without placing the Color Finale app in /Applications, the wheels and curves appear in the inspector but produce no image change. The two pieces rely on an XPC connection — no app, no processing. The fix is trivial: make sure the .app bundle sits in the Applications folder, not nested inside a subfolder or still inside the mounted disk image.
LUT loading order confuses editors used to Final Cut Pro's built-in LUT effect. Color Finale places a LUT inside a layer stack, not as a standalone transform at the end of the pipeline. If you drop a technical LUT — say a LogC to Rec709 conversion — on layer 3 while wheels sit on layers 1 and 2, you're grading before the transform, which washes out the image. The work pattern that avoids this: put the technical LUT on the bottom layer, then stack creative adjustments above it.
A small but sharp-edged limit: the plug-in does not pass HDR metadata through the pipeline in the way FCP's native tools do. Grading an HLG or PQ clip inside Color Finale produces a correct-looking preview on an SDR display, but the exported file may not carry the right NCLC tags for HDR delivery. Editors working in Rec.2020 PQ should check the export metadata in Compressor or another tool before final delivery, and consider applying the final trim pass inside FCP's own colour tools if the destination requires strict HDR flagging.
Option-Drag for Finer Wheel Increments
The colour wheel section has a hidden precision mode that activates when you hold the Option key while dragging a wheel control. Instead of the standard 8-bit stepping, the adjustment moves in finer increments — useful when you're nudging a shadow tint by half a percent and the mouse keeps jumping past the target. The same Option-drag behaviour applies to the saturation slider in the Primary Vectors panel.
Right-clicking any colour wheel resets that wheel to neutral without touching the others. Right-clicking a layer label in the stack duplicates that layer with all its adjustments intact — a quick way to build a split-tone effect by duplicating a base grade, shifting the copy's highlight wheel, then masking it to the upper third of the frame.
The HSL Curves graph accepts direct numerical input if you double-click a control point. Instead of squinting at the cursor position, you can type exact hue angles and saturation percentages. For editors matching a grade across multiple clips, this means copying numbers from one instance to the next works with pixel-level precision rather than by-eye approximation.
A keyboard shortcut that saves real time: Command-Shift-E exports the current grade as a .cube LUT immediately — no menu diving, no export dialog hunting. The file lands on the desktop with a timestamp in the filename, so rapid iteration during a session leaves a breadcrumb trail of look versions. Combined with the preset store's Command-Shift-S shortcut for saving the full layer stack, an editor can capture both a flattened LUT and a fully editable preset in under two seconds.
Test ASCEND Presets Against a Skin-and-Grey-Card Clip
Before grading anything, place a known test clip on the timeline — ideally one with skin tones, a neutral grey card and some saturated primaries — and run through the ASCEND presets one by one. This is not about finding a look to use; it's about learning which presets push the wheels hard and which stay conservative, so when you need a fast starting point for a real project you already know the personality of each preset.
Set up a default layer template and save it as a preset on day one. Most editors end up with the same bottom two layers on every grade: a technical transform LUT and a basic exposure balance. Building this once and saving it means every new clip starts from a neutral, technically correct base instead of the plug-in's flat default state. Name the preset something obvious like "00_BASE" so it sorts to the top of the preset list.
The separate Color Finale application can be launched independently to browse and organise presets outside Final Cut Pro. Use this for housekeeping: delete presets you'll never use, rename the ones you imported from another editor, and group them into folders that match your project structure. The in-FCP preset browser shows the same folder hierarchy, so time spent organising outside the host pays off every time you apply a preset inside a timeline.
One workflow habit that prevents frustration later: always check the layer blending mode dropdown when stacking adjustments. It defaults to Normal, but switching an upper layer to Luminosity lets you shape contrast without shifting the colour balance from lower layers. Editors coming from Resolve often look for this behaviour and assume it isn't available — it is, but it's tucked in a small menu on each layer row, easily overlooked.
No More Daily Gatekeeper Override with 2.2.8
Earlier builds of Color Finale 2 required a manual Gatekeeper override at every launch of the helper application — a Terminal command or a right-click Open ritual that grew tiresome across daily use. The current 2.2.8 build includes a Gatekeeper-friendly wrapper that handles this once during installation. The mounted disk image presents a clear "press Enter to bypass" step, and from then on the application launches without security prompts. For editors who update macOS regularly, this removes a small but persistent friction point.
The 64-bit x86 build in 2.2.8 brought stability improvements on Intel machines running macOS 10.12 through to current releases at the time. Users on older 2.0.x versions saw occasional render glitches — black frames at clip boundaries, or the effect failing to initialise after a timeline jump — that the later build largely eliminated through updated Metal API calls. The practical result is that scrubbing through a graded timeline no longer requires a half-second pause to let the effect catch up.
Preset handling tightened across the 2.2.x line. Earlier versions stored presets in a flat list that grew unwieldy past 40 or 50 entries. The current build supports nested folders, and the preset browser inside the effect panel now shows a collapsible tree rather than a single scrolling list. For editors who maintain project-specific look libraries or who work across multiple genres, this change cut preset retrieval time from a slow scroll to a direct click.
One behavioural shift worth noting: the LUT Utility integration, which was a separate install in the 1.x era, is now bundled directly into the effect. Applying a LUT no longer requires launching a second plug-in — it's a layer type inside the main stack. This change is invisible to new users but removes a workflow step that returning editors still sometimes hunt for in the effects browser out of habit.
- macOS 10.12 or later
- Intel processor
- Final Cut Pro X or Motion (host application)
Questions on file
Can Color Finale write LUTs from layered grades?
Yes — the LUT authoring tool exports .cube files from your complete grade, including masked adjustments and layered corrections.
Sign in · Create an account to add a field note.
No field notes yet. A measurement, a version, a machine — they appear after moderation.