
Final Cut Pro Plugins
Flicker Free 2.1.6
Final Cut Pro PluginsUpdated
| Requirement | On file |
|---|---|
| macOS | See the sheet |
| CPU | Apple Silicon, Intel 64-bit |
| Download | 24 MB |
Support spans six host types: Final Cut Pro, After Effects, Premiere Pro, Avid, DaVinci Resolve and any OpenFX-compatible application. The 2.1.6 release targets temporal inconsistencies, not spatial noise, and runs natively on both Apple silicon and Intel Macs.
What It Fixes
The filter deals with rolling flicker caused by fluorescent and other mains-powered lighting, by CRT or LCD screens caught in shot, and by the fast shutter speeds used for high-frame-rate and time-lapse work. Footage from cameras such as the Phantom Flex, Sony FS700U or GoPro HERO3 Black is the typical source.
Match the Host Format
Check whether your editor loads FxPlug, OpenFX or its own native effect format before placing the plugin. A mismatch keeps the filter out of the effects panel.
Deflicker Passes You Can Stack Without Leaving a Host
Colour Space the Plugin Inherits From Your Timeline
Flicker Free sits inside the host, so it inherits the colour management of whichever application it’s running in. In DaVinci Resolve, that means the plugin operates in the timeline colour space you’ve set — RCM or ACES — and won’t fight the grade applied upstream. In Final Cut Pro, it respects the library’s wide-gamut working space, which matters when you’re pulling keys or adding contrast after deflickering. The one point of friction is Motion: Flicker Free doesn’t appear inside Motion’s effect library even on machines where the FxPlug version works in Final Cut Pro, because Motion uses a different effect scanning path.
On the macOS side, the plugin writes no preference panes and no login items. Its analysis cache lives inside the host’s own temporary folders, so utilities like CleanMyMac or Onyx will purge it during routine maintenance. That’s normally harmless — the filter simply rebuilds the frame analysis on the next pass. If you’re on a Mac with a Pro Display XDR and a reference mode active, the GPU path the plugin uses for frame blending remains unchanged; the effect renders the same on a MacBook Air screen and a reference monitor, which keeps QC predictable.
Saving Slider Tweaks That Survive a Project Relaunch
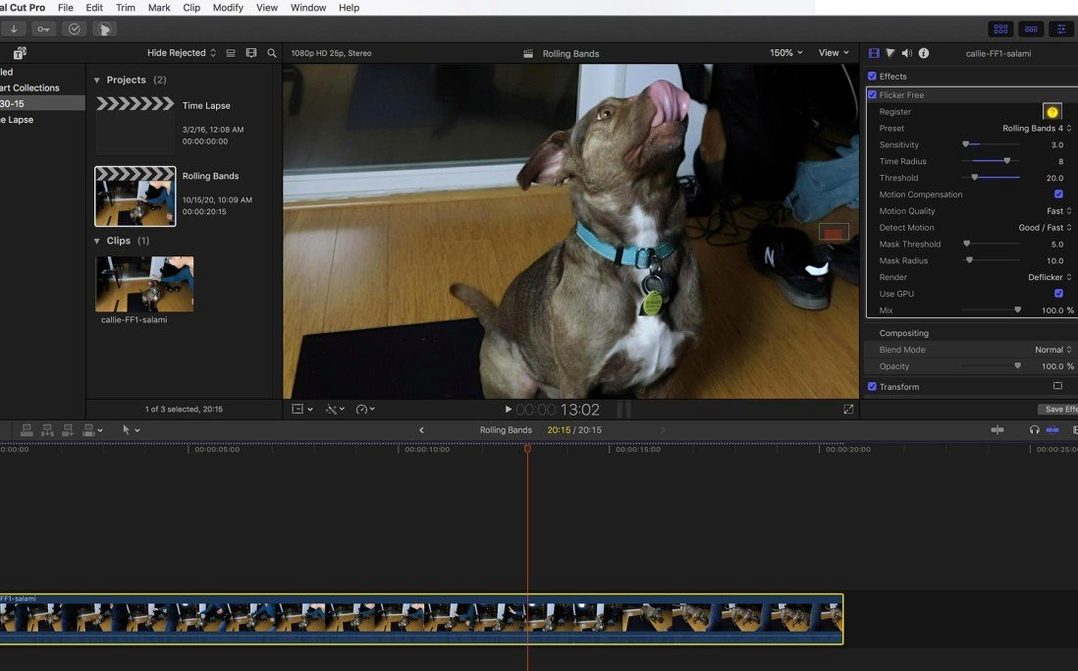
The preset dropdown at the top of the effect panel is more than a starting-point picker. Selecting a preset, then adjusting the Time Radius or Sensitivity slider and saving the project, stores your deviation alongside the preset name. Re-open the project and the panel shows the preset name unchanged — but the internal parameters reflect your tweaks. That saves you from having to re‑dial settings after a crash or a machine restart.
A few other non-obvious behaviours:
- Option‑dragging the Sensitivity slider in After Effects gives you tenth‑of‑a‑unit control, useful when a setting of 7 is too weak and 8 smears fast motion.
- In Premiere Pro, the effect responds to the Render and Replace command on a clip, so you can bake the deflicker into a piece of media and free up GPU headroom for colour work downstream.
- When applied to an adjustment layer in Final Cut Pro, the plugin processes the composite of everything below it. That can catch flicker introduced by stacked generators or titles — a trick that isn’t obvious until you test it.
- In DaVinci Resolve, dropping Flicker Free onto a node rather than the clip’s main corrector node lets you window‑track the effect. A power window around a flickering sign, for instance, stops the filter from softening detail in the rest of the frame.
Analysis Profile That Stops Time‑Lapse Strobing
The defaults assume a mild, lighting‑based flicker at standard frame rates. That profile barely touches time‑lapse material. For time‑lapse, switch the Detection mode to “Time Lapse” before touching any other control — it re‑weights the analysis to look for large luminance swings across frames that may be seconds apart in real time. The Time Radius default of 3 is also too narrow for slow‑motion footage shot under 50 Hz or 60 Hz lighting; pushing it to 5 or 7 gives the algorithm enough temporal context to map the beat frequency of the lights.
The other control worth adjusting early is Blend Mode. The default “Luminance” setting works on brightness flicker only. If you’re seeing colour-temperature shifts (common with LED stage lighting that pulses in the blue or magenta channel), switch to “Color” mode. For mixed lighting where both luminance and chroma flicker — a gym with fluorescents and a video wall — “All” mode is heavier on the GPU but solves both in one pass. On machines with shared memory (a base M1 or M2), “All” mode on a 4K timeline can drop the render to single‑digit frames per second, so run a 10‑second test render before locking in the setting.
Fast‑Motion Ghosting Tied to an Over‑Long Time Radius
Ghosting on fast motion. This is the most frequent complaint and it almost always traces back to the Time Radius being set too high relative to the speed of the subject. For footage with rapid camera pans or subjects crossing the frame in under a second, drop the radius to 2 and raise Sensitivity instead. If ghosting persists, enable the Motion Compensation checkbox — it’s off by default because it doubles the render time, but it identifies object motion vectors and excludes them from the blending pass.
Effect not appearing in the effects panel. This happens most often on Macs that have both an Intel and an Apple‑silicon version of the host application installed. The plugin installer places the .bundle files in the system‑level plug‑in directories; if the host is running under Rosetta, it may look in an alternate path. The fix is to confirm the host is running natively (Get Info on the application and uncheck “Open using Rosetta”) and, for OpenFX hosts, to check the OFX plugin path in the host’s preferences.
Flicker returns after rendering. Some NLEs apply temporal effects in a separate pass during export. If the renderer skips the effect because of a mismatch between the timeline frame rate and the export frame rate, the deflicker never runs. The workaround is to render the clip in‑timeline first (Premiere Pro’s “Render Effects In to Out” or Final Cut’s “Render Selection”) and check the result at full resolution before exporting. If you’re searching for a flicker free plugin free download mac alternative, note that built‑in host filters rarely offer the same per‑channel detection granularity, so the extra render step is often the price of the precision.
Black frames at clip boundaries. The plugin needs neighbouring frames to analyse. At the very first and last frame of a clip, it has nothing beyond the edge, so it either produces a dimmed frame or a black one depending on the host. The simplest defence is to extend the clip handles by six frames in the timeline before applying the effect — the extra frames give the temporal window room to work, and you trim them off afterwards.
Deflickering works across neighbouring frames, so render a short test section before committing a long timeline. The interface is English only.
- Intel and Apple Silicon
- English interface
Questions on file
What causes the flicker that this plugin targets?
It handles rolling flicker from fluorescent lighting, CRT or LCD computer monitors, and the rapid shutter speeds common in high-frame-rate and time-lapse footage.
Which camera sources are suitable for processing?
High-frame-rate footage from cameras such as the Phantom Flex, Sony FS700U or GoPro HERO3 Black, along with time-lapse sequences from any camera.
Is this a built-in effect inside editing software?
No, it is a third-party plugin that must be installed separately into a supported host such as Final Cut Pro, Premiere Pro or DaVinci Resolve.
Sign in · Create an account to add a field note.
No field notes yet. A measurement, a version, a machine — they appear after moderation.