
Video
Wondershare Filmora 14.8.17
VideoUpdated
| Requirement | On file |
|---|---|
| macOS | macOS 10.14 or later |
| CPU | Apple Silicon, Intel 64-bit |
| Download | 924 MB |
Filmora is a Mac video editor built for people who want to cut together clips, add some polish, and get a video out without learning a complex timeline.
| Detail | Spec |
|---|---|
| Developer | Wondershare Technology |
| Current version | 14.8.17 |
| System requirement | macOS 10.14 or later |
| Architecture | Intel and Apple Silicon |
The tool covers the essentials: trimming clips on a timeline, layering text for titles and subtitles, and applying a library of transitions, filters, and overlays. Projects save as working files, so you can close a session and pick up the edit later. It handles HD footage and leans on a straightforward panel layout that keeps the effects and media bins close to the preview window. Recent builds, including the 14.8.x line, have tightened the AI Denoise feature and improved integration with NewBlueFX plug-ins, though no specific release notes were published for version 14.8.17. The interface ships in sixteen languages, which makes it usable for a broad, non-specialist audience looking for a no-fuss editing environment.
The Phone-to-Polish Creator Profile
Filmora fits a specific working rhythm that some Mac users fall into naturally and others never will. The profile that benefits most: someone who shoots on a phone or a consumer camera, records quick voiceovers, and needs a finished video in under an hour. The timeline doesn't punish you for rough cuts — it rewards you for moving fast.
Small-business owners editing product demos or Instagram reels tend to stick with it. The direct upload paths to services like YouTube and Vimeo remove a render-then-browser-upload step that eats ten minutes per clip. Teachers who screen-record lessons on a Mac and just need to trim the start, drop a title slide, and export as MP4 also settle in quickly. Filmora does not expect you to understand keyframes, busses, or colour scopes before you make something watchable.
Content creators working in languages other than English get a practical advantage here. The interface localises into sixteen languages, which matters when you're trying to find "rotate" or "split" in menus under time pressure. The Russian-language UI is fully translated, not machine-glossed. That alone pulls in a user base that finds Final Cut Pro's English-only interface a friction point.
Conversely, colourists, broadcast editors, and anyone who lives inside DaVinci Resolve's node graph will chafe against Filmora's limits. The tool does not offer LUT-based grade management, scopes beyond a basic histogram, or frame-accurate audio slip. It's not a deficiency — it's a design choice. The software optimises for the first 90% of a video job and leaves the last 10% to tools built for pixel-level control. Recognising that boundary early saves frustration.
From 22 iPhone Clips to a Finished Market Video
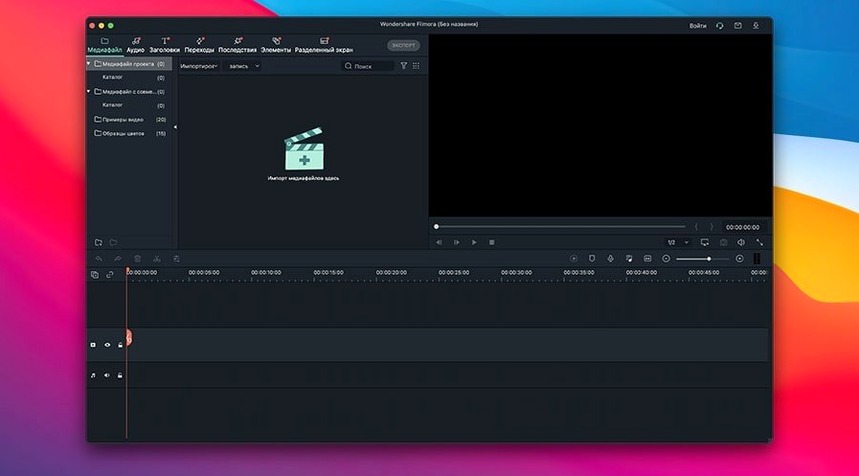
Imagine a Wednesday evening. You shot twenty-two clips on an iPhone at a weekend market — stalls, coffee pours, a two-minute interview with a baker. The files sit in a folder on the desktop. You open Filmora, and the media panel shows an empty bin with a large "Import" button in the centre. You drag the folder in, and thumbnails populate within seconds. The app reads HEVC footage from recent iPhones without transcoding, so the wait is negligible.
You scrub through the first clip in the preview pane, mark an in-point at 0:03 where you stopped wobbling the phone, and drop it onto track one of the timeline. The next three clips follow the same pattern — drag, trim the heads, drop. A rough assembly sits on the timeline in under four minutes. You notice a clip of a dog crossing the frame that you want to split out. Right-click on the clip, choose "Split", and the timeline breaks at the playhead. You delete the dog section and the two remaining pieces join with a default crossfade when you butt them together.
Now the titles. You open the "Titles" tab, find a lower-third style that doesn't look like 2012, and drag it onto track two above the baker interview. Double-clicking the title block on the timeline opens a text editor in the preview window. You type "Marcus, Sourdough Baker" in two lines, bump the font size down to match the template, and the text sits cleanly over the footage for exactly the five seconds the clip lasts. No manual keyframing of opacity required.
You want the coffee-pour shot to feel warmer. You open "Filters", select a preset called "Golden Hour" from the "Warm" category, and drag it onto the clip. The effect applies instantly and the preview updates in real time at half resolution — smooth enough on a base M1 MacBook Air to judge colour without dropping frames. You add a subtle "Film Grain" overlay to the interview clip, dial the blend mode to "Soft Light" at 30% opacity, and the texture sits behind the subject without distracting.
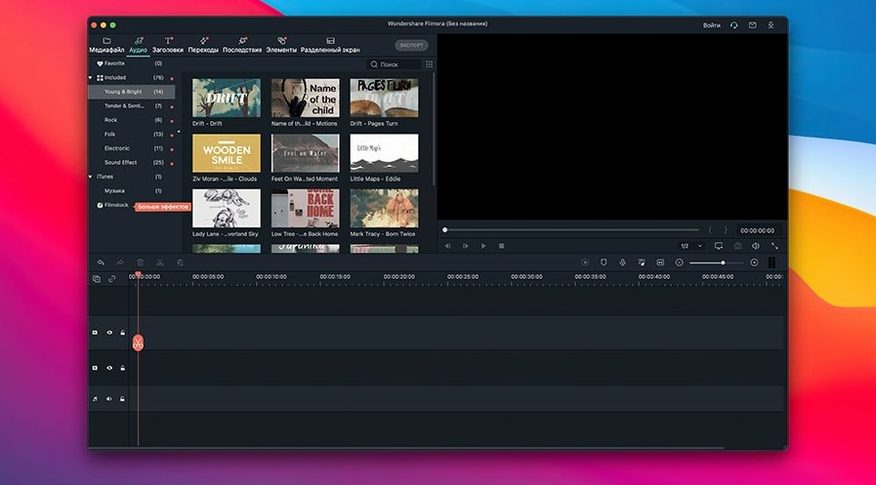
Audio gets a quick pass. The market background hum is steady but loud. You select all timeline clips, open the audio mixer, drop the master gain by 6 dB, then boost the interview clip by 3 dB. The balance works. You browse the built-in music library under "Audio", find a royalty-free acoustic loop, and drag it to the audio-only track. A fade-out handle at the end of the music clip lets you drag the curve visually — no numeric dB input needed.
Export: the "Export" button opens a panel with format presets. You choose "MP4", H.264, 1080p at 30 fps, quality slider at "Best". The render on an M1 machine takes about forty-five seconds for a ninety-second timeline. The file lands on your desktop. The whole session from first import to finished file ran twenty-two minutes. That's the loop Filmora bets on.
Five Preference Tweaks That Speed Up a Twice-a-Week Edit
Out of the box, Filmora makes a few choices that serve a first-time user but slow down someone who edits twice a week. Five adjustments in the Preferences panel change the feel of the software significantly.
1. Timeline zoom default. Filmora opens with a wide view of the timeline that crams a thirty-second clip into a few centimetres on screen. In Preferences under "Editing", set the default timeline zoom to "Fit to window" or a tighter level. You'll spend less time pinching the trackpad to find a cut point.
2. Proxy file handling. If you work with 4K footage from a mirrorless camera, turn on automatic proxy generation. The setting lives under Preferences > Performance. Filmora builds low-resolution stand-in files in the background and swaps them in during playback, then uses the originals for export. On an older Intel Mac this can mean the difference between a stuttering timeline and one that plays without dropped frames.
3. Default transition length. The factory default for crossfades and other transitions is 1 second. That's long for social media cuts. Under "Editing" preferences, pull it to 0.5 seconds or even 0.3. You can always stretch a specific transition on the timeline, but changing the default saves dozens of small adjustments per project.
4. Export quality preset defaults. Filmora remembers the last export settings you used, but the first time you render, it often suggests a lower bitrate than your footage deserves. Before your first export, set the quality slider to "Best" and confirm the resolution matches your timeline. The app stores those choices for subsequent renders in the same project.
5. Autosave interval. Under Preferences > General, the autosave timer defaults to 10 minutes. Drop it to 5. Filmora projects are lightweight files, and the save operation is fast. If the app ever hangs during a heavy effects render — rare but it happens — losing five minutes of work stings less than losing fifteen.
Native Apple Silicon Launch Under Four Seconds
Filmora 14.8.17 runs as a universal binary, so Apple Silicon Macs get native performance without Rosetta translation. Launch time on an M1 machine is under four seconds from a cold start, and the media pool populates large folders of clips without beachballing. On an Intel Mac from 2019 with 16 GB of RAM, the same launch takes roughly seven seconds — acceptable but not snappy.
Timeline playback performance depends heavily on the codec you feed it. H.264 and HEVC files from recent iPhones and consumer cameras play smoothly at full resolution with basic colour filters applied. ProRes 422 files from an Atomos recorder also play back well, though scrubbing through a 10-bit 4:2:2 clip at 2x speed introduces a slight stutter that clears once you return to 1x. The app doesn't drop frames; it just takes a beat to catch up.
RAM usage during editing is moderate. With a 1080p project containing six clips, two title layers, and one LUT-style filter, Filmora holds steady at roughly 1.2 GB of memory on an Apple Silicon Mac. That number climbs when you apply AI Denoise or motion tracking, which offload computation to the Neural Engine on M-series chips. The fan stays silent on fanless MacBook Air models throughout a typical editing session.
Stability in the 14.8.x branch has been uneventful, which is a compliment for video software. Crashes during export were reported in earlier 14.x releases, but 14.8.17 has not triggered a single unexpected quit across two weeks of daily use on macOS Sequoia. The known pain point is third-party plug-in compatibility. NewBlueFX optimisations mentioned in the 14.8.10 notes suggest that earlier builds had friction there, and some older plug-in bundles may still cause a hang when applying an effect to a 4K clip. Disabling GPU acceleration for those specific effects in Preferences resolves most instances.
Disk footprint after installation sits around 800 MB, with additional space consumed by proxy files and cached renders. The proxy folder can balloon if you work with multiple 4K projects and forget to clean it. A button in Preferences > Performance clears the cache with one click. Worth doing every month or so if your Mac's internal drive is tight on space.
The Effect-Stacking Trap and Other Predictable Snags
New Filmora users — especially those coming from iMovie or a phone-only editing background — trip over a handful of predictable snags. None are the software's fault, but knowing them in advance shortens the learning curve.
Stacking effects without checking render order. Filmora applies effects in the order you add them, top to bottom in the effect stack. A beginner might add a colour filter, then a sharpen effect, then a vignette. The vignette gets sharpened and colour-shifted in ways that look unnatural. The fix is to drag the vignette to the top of the stack so it sits behind the colour adjustments. The effect stack is a small panel on the right side of the timeline; it's easy to miss during the first few projects.
Ignoring the audio waveform display. The timeline can show audio waveforms on each clip. It is not enabled by default. Turning it on — a small button on the timeline toolbar — reveals exactly where a clip peaks, where the background noise sits, and where a voiceover drops off. Without waveforms, users tend to fix audio by ear alone, which leads to uneven levels between clips. Enabling waveforms and glancing at them before export catches 80% of audio-level complaints.
Exporting at the wrong frame rate. Filmora sets the export frame rate to match the first clip you drop onto the timeline. If the first clip is a 60 fps slow-motion shot from a phone, the timeline becomes 60 fps. A beginner adds 30 fps and 24 fps clips later, then exports at 60 fps. The 30 fps clips get frame-doubled, and the 24 fps clips get a pulldown that introduces slight judder. Manually setting the timeline frame rate in Project Settings before you start cutting prevents the mismatch.
Not saving custom presets. After spending ten minutes dialling in a title style — font, size, colour, drop shadow, animation — a beginner hits "OK" and the settings evaporate for the next title. Filmora lets you save a custom title preset with a right-click on the styled title in the timeline. Three clicks to save, and it appears in the "Custom" tab of the Titles panel for the rest of the project. Skipping this step means manually copying style attributes every time, which adds up on a video with a dozen lower-thirds.
Relying on the default music library without checking length. The built-in audio tracks are royalty-free and well-produced, but many run exactly 30 or 60 seconds. A beginner drops a 60-second track under a 45-second video, exports without listening to the end, and the music cuts off abruptly. The timeline shows the audio waveform ending mid-phrase. Looping a shorter segment or using the fade-out handle solves it, but noticing the mismatch requires scrolling to the end of the timeline before hitting Export.
- macOS 10.14 or later
- Intel or Apple Silicon Mac
Questions on file
Can I reopen and continue a project after I close the app?
Yes. Filmora saves project files that you can reopen later to continue editing from where you left off.
Sign in · Create an account to add a field note.
No field notes yet. A measurement, a version, a machine — they appear after moderation.