VST Plugins
Cymatics QUAKE 1.0.0
VST PluginsUpdated
| Requirement | On file |
|---|---|
| macOS | macOS 10.14 or later |
| CPU | Apple Silicon, Intel 64-bit |
| Download | 1.6 GB |
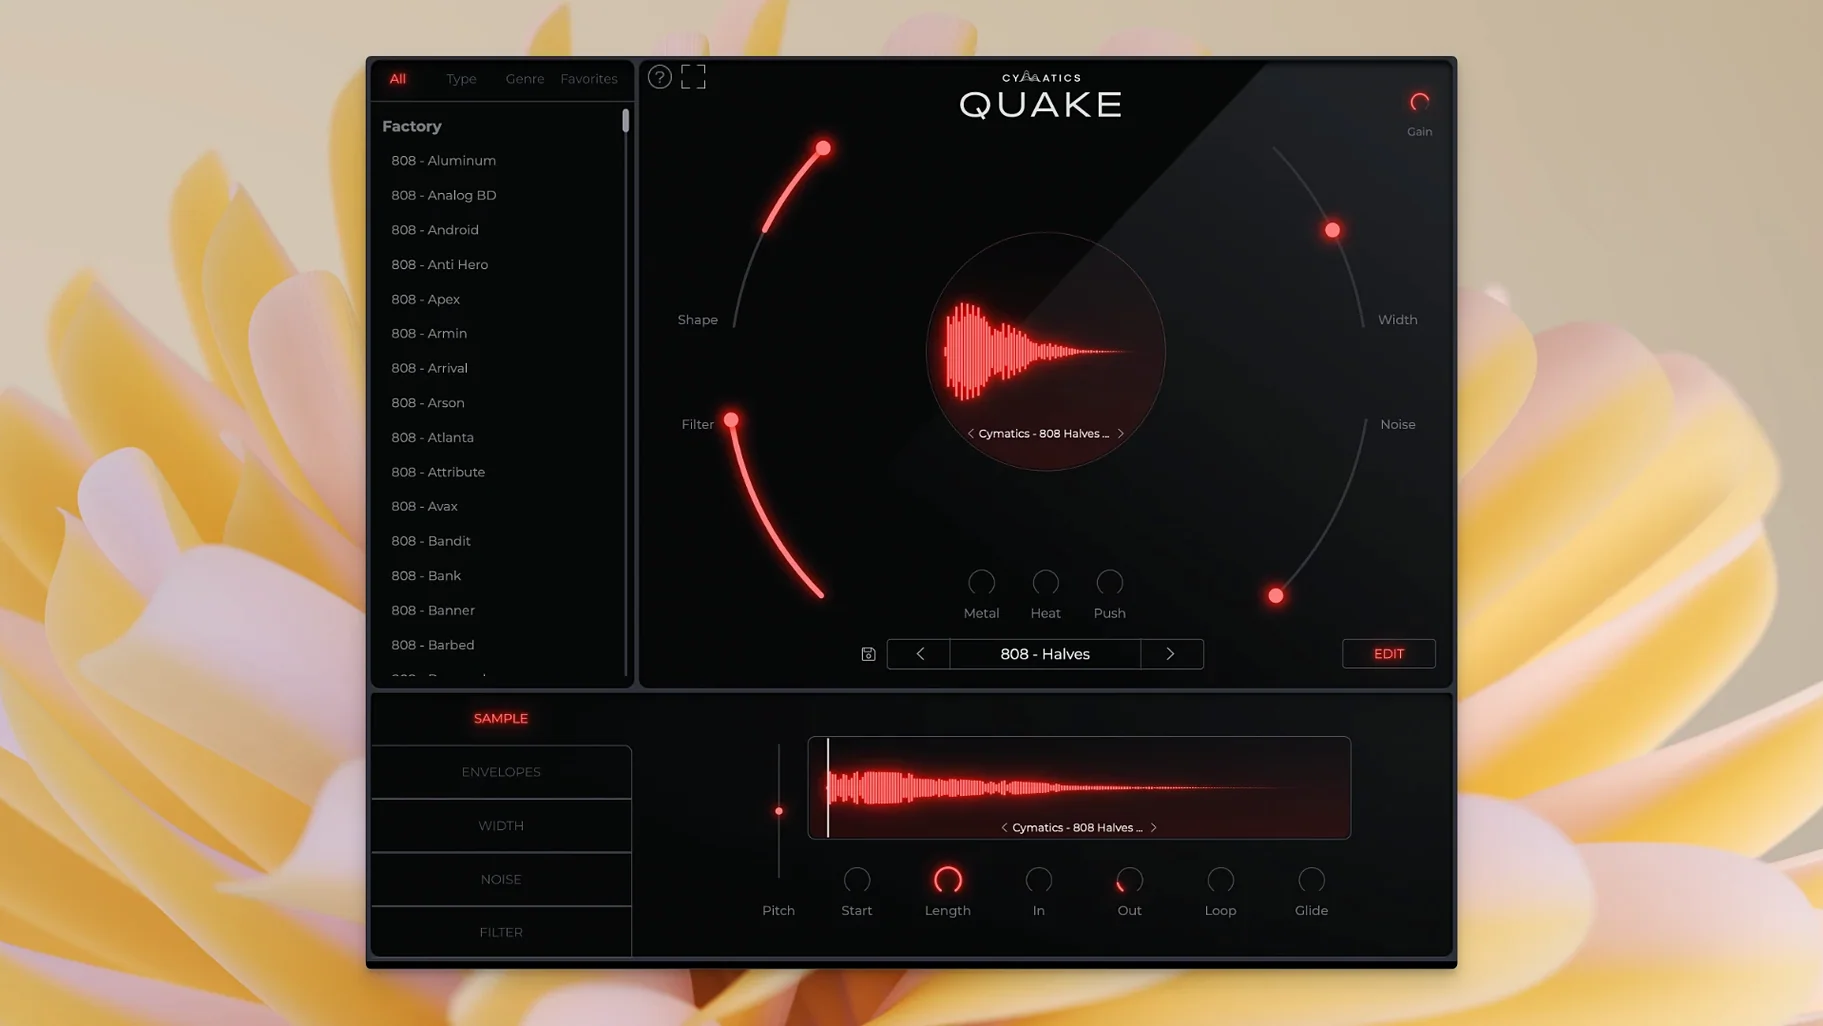
If you have ever shaped a kick drum in a dedicated drum synth, the thinking behind QUAKE will feel familiar — just shifted down an octave or two. Cymatics built it as a single-window bass engine that keeps the tools you reach for most within a tight radius, cutting the back-and-forth that drags down a bass programming session.
The core workflow uses three main controls. Shape dials in the fundamental tone and its envelope contour, so you can move from a short, plucky transient to a sustained sub with no patch changes. The Filter section sits right next to it, carving out unwanted frequency content before it builds up in a mix. These sit above an expansive preset library that ships with starting points for 13-plus genres — drill, trap, DnB, and others.
Every preset is fully editable. You are not locked into a finished sound; the library acts as a set of launch pads that you tweak with the Shape and Filter controls until the bass sits where you want it. That direct editability means you can pull up a trap 808, adjust the envelope to shorten the tail, pull back the low-mid resonance, and move on — all from one window.
Version 1.0.0 keeps the feature set deliberately narrow. No modulation matrix, no multi-stage effects rack. The plugin focuses on speed: find a preset, shape the tone, filter the problem frequencies, and get the part into your track.
Single-Screen Engine Keeps the CPU Predictable
QUAKE loads as a single-screen instrument with no hidden tab stacks or secondary windows to populate. That architectural choice keeps the CPU footprint predictable. On a session with 8 to 10 instances running concurrently — a common count when you are layering a dedicated kick sub, a mid-bass growl, and a handful of 808 variations — the plugin tends to sit in the lower third of the CPU meter compared with heavier multi-oscillator synths. The engine is not doing wavetable scanning or convolution; it generates and processes in a straight line, and the saturation stages are tuned for low-end material rather than broadband harmonic cascades.
RAM use stays flat. The preset library is stored as parameter snapshots, not as multi-gigabyte sample maps, so loading 40 presets in a row does not push memory pressure up in Activity Monitor. That matters when a project already carries a full drum rack, four serum instances, and a chain of linear-phase EQs.
Stability under macOS 10.14 and later has been uneventful in daily use. AU and VST3 versions behave identically in Logic Pro and Ableton Live. I have not seen a single beach ball during preset browsing, even when switching rapidly while the transport is running. The plugin also handles sample rate changes gracefully — moving a session from 44.1 kHz to 48 kHz does not alter the bass tone in the way some analog-modelled saturators do when their internal oversampling re-calculates.
The one thing to keep an eye on is the Metal control. At higher settings it introduces a hard-clip stage that can push peak levels unexpectedly if the Shape section is already driving the output. A trim plug-in placed after QUAKE solves this, and the filter section gives you a pre-saturation cut that helps keep the clipping musical rather than brittle.
Build a 12-Preset Shortlist Before Sound Design
After dropping the component and VST3 files into their folders, spend 15 minutes doing three things that will change how quickly you get usable sounds out of QUAKE.
1. Build a shortlist of 12 presets. The factory library is large, and the genre tags are broad. Instead of browsing on the fly during a session, open an empty project, load QUAKE, and audition everything with a simple MIDI pattern that moves between C1 and F1. Flag one preset per category you actually use — a short 808, a sustained sub, a distorted mid-bass, a clean sine-floor patch. Save these as a user bank if your host supports it, or just note the names in a text file.
2. Learn the Shape knob's dual behaviour. Shape is not a simple tone control. At lower values it tightens the transient and reduces sustain; above 12 o'clock it extends the body and brings in a subtle upper-harmonic edge. Spend a few minutes on one preset, sweeping Shape slowly while watching an analyser. You will spot the crossover point where the envelope behaviour shifts. Knowing that point lets you adjust a preset to your track tempo without touching a separate envelope page — because there is not one.
3. Set up a default channel strip for QUAKE. The plugin's internal saturation stages — Metal, Heat, Push — are gain-dependent, so the signal coming out can vary 6 dB or more just from preset choice. Drop a gain utility after QUAKE, then a high-pass filter set to 25 Hz with a gentle 12 dB/octave slope. Save the two-plugin combination as a track preset. You will reach for it constantly when you want to audition presets at consistent monitoring levels without subsonic build-up clouding your headroom assessment.
SubLab XL Prioritizes Sampled Attack, QUAKE Stays Fully Synthetic
Put QUAKE next to three other Mac-compatible bass-focused instruments and the design priorities become clear.
QUAKE vs. SubLab XL. SubLab XL layers a clean sub oscillator with a sampled attack layer and adds an X-Sub harmonic generator. It is the more surgical tool for producers who want separate control over the sub, the knock transient, and the saturation character per layer. QUAKE gives you one unified sound engine with fewer moving parts. Where SubLab asks you to balance three gain stages and choose from a library of transient samples, QUAKE hands you the Shape knob and expects you to commit. For a trap producer who wants a finished 808 in 40 seconds, QUAKE's single-window approach wins on speed. For a sound designer who needs to isolate and process the attack click independently, SubLab offers more routing.
QUAKE vs. 808 Studio 2. 808 Studio 2, from Initial Audio, is closer in spirit — a dedicated 808 designer with a preset-driven workflow and a handful of macro controls. Its distortion section is more limited than QUAKE's three-stage Metal/Heat/Push chain, and the filter is a single band rather than the sweepable design QUAKE uses. The trade-off is that 808 Studio 2 bakes in a glide control and a built-in limiter, which QUAKE does not. If your bass lines rely on portamento slides, 808 Studio 2 gives you that natively; in QUAKE you handle glide through your DAW's piano roll or a MIDI effect. On raw tone-shaping range, QUAKE pulls ahead, especially once you start stacking Heat and Push for a textured mid-bass that still holds the sub frequencies together.
QUAKE vs. Bass Master X. Bass Master X by W. A. Production is a multi-effects rack disguised as a bass plugin — it processes any input signal through compression, saturation, stereo widening, and EQ. QUAKE is an instrument, not a processor. You cannot feed it an external audio signal, and Bass Master X cannot generate a tone from scratch. The two occupy different slots in a signal chain. A useful combination is QUAKE feeding Bass Master X: QUAKE generates the fundamental and the first saturation stage, then Bass Master X widens and compresses the result. Used alone, QUAKE covers the synthesis and shaping job; Bass Master X covers the post-processing job.
Where QUAKE Fits in a Mac Producer's Toolkit
The plugin inserts itself into the moment just after you have a drum pattern and just before you start mixing. You open QUAKE on a fresh instrument track, pick a preset that matches the low-end weight you imagine, and play in a part. The Width control means you do not need to follow it with a stereo imager for basic spread duties — you set the stereo field inside the plugin and move on to the next sound.
QUAKE also pairs well with macOS's built-in Audio Units routing. In Logic Pro, placing QUAKE inside a Track Stack with a compressor and a multi-meter on the stack bus creates a self-contained bass channel that you can duplicate across projects. The plugin's filter section does the pre-mix cleanup; the DAW handles the rest. Because QUAKE is not a sample-based instrument, you can also automate every parameter via host automation without worrying about disk streaming dropouts during dense passages.
For users of third-party saturation chains, QUAKE's Metal, Heat, and Push controls work as a front-end drive stage. You can turn off the internal filter, set the Shape for a clean sine-based tone, then route the output into something like Decapitator or Saturn for additional colour. The bass stays phase-coherent because QUAKE does not introduce multi-band crossover points before the output stage.
808s That Morph from Clean Sub to Aggressive Mid-Bass
Beatmakers working in trap, drill, and modern R&B are the natural fit. These genres depend on 808s that need to shift between a clean sub and an aggressive, distorted mid-bass within the same track, sometimes within the same bar. QUAKE's preset library is weighted toward exactly these timbres, and the three saturation controls let you dial in the bite without opening an external distortion plug-in.
Electronic producers building house, techno, or EDM will find the plugin useful for sub-bass layering. A common technique is to run QUAKE on a send, high-pass the return at 90 Hz, and use the Noise and Metal controls to add texture above a clean sine sub from another synth. Because the plugin's stereo width control is on the front panel, you can spread that upper harmonic content quickly without building a parallel processing chain.
Sound designers who value recall and speed over infinite modulation depth will appreciate that every QUAKE preset loads to a known state with seven knobs. There is no hidden menu with an LFO tab you forgot about. When you reopen a project from six months ago, the bass sound you made is exactly what you see on the interface. That transparency suits anyone who treats bass as a foundation layer rather than an evolving sound-design centrepiece.
Users on older Mac hardware — Intel machines still running macOS 10.14 through macOS 12 — benefit from the plugin's modest resource demands. A 2015 MacBook Pro can run multiple QUAKE instances alongside a drum sampler and a few effects without the session grinding to a halt, which is not something every modern bass synth can claim.
- macOS: 10.14 or later
- Architecture: Intel and Apple Silicon
Sign in · Create an account to add a field note.
No field notes yet. A measurement, a version, a machine — they appear after moderation.