Audio
Cockos REAPER 7.4.8
AudioUpdated
| Requirement | On file |
|---|---|
| macOS | macOS 10.15 or later |
| CPU | Apple Silicon, Intel 64-bit |
| Download | 57 MB |
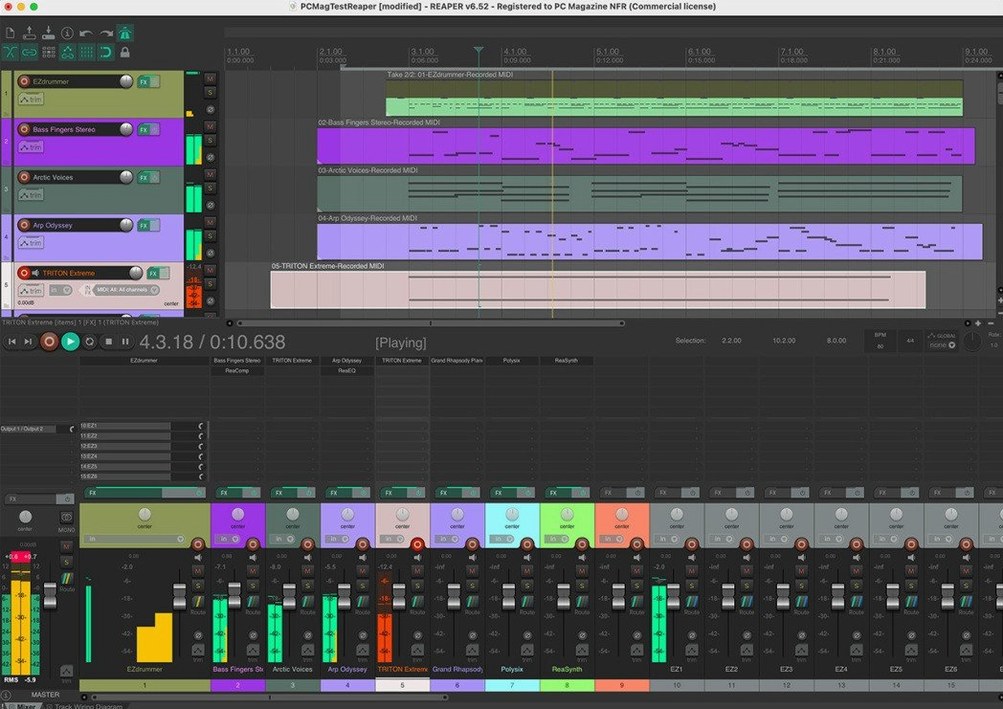
Folder tracks remain the central organisational logic — place one track above others and click the folder button to route them through it. REAPER 7.4.8 is a digital audio production application providing a complete multitrack environment for recording, editing, processing, mixing, and mastering audio and MIDI. Its architecture treats every lane the same way.
Universal track — a single track type handles audio, MIDI, video, and buses. There are no separate instrument, bus, or aux channel designations.
Folder routing — group tracks by placing a parent above them and toggling the folder icon. Signal flows from child tracks into the parent for summed processing without dedicated bus tracks.
Loopback ceiling — supports up to 512 additional channels of loopback audio, routing internal application audio between software without external cables.
MIDI hardware headroom — addresses up to 128 MIDI output hardware and loopback devices, enough for a room full of external synthesizers and samplers.
First Days with REAPER — What Actually Matters
Opening REAPER for the first time feels like walking into an empty warehouse with every tool on shelves you haven't labelled yet. The interface is functional, not decorative. Spend the first few hours building muscle memory for three things: the right-click context menu, the Actions list (Shift+/), and track routing. Everything else flows from those.
Resist the urge to import a 40-track session immediately. Start with four or five tracks — a drum loop, bass, keys, and a vocal take — and get comfortable with how signal moves through folders before you commit to a full arrangement. The Routing Matrix (View menu) will make more sense once you've wired a few sends manually. Open it on day one and leave it docked.
Also dock the undo history window. REAPER's undo is deep and non-linear; you can branch off from any point and return. Knowing where you are in the undo tree prevents the sinking feeling of having painted yourself into a corner 40 moves ago.
Check Your Audio Device Settings First
Before recording a single sample, open Preferences → Audio → Device and confirm the sample rate matches your interface. A mismatch here causes clicks, drift, and recordings that play back at the wrong speed. Set the block size low (128 or 64 samples) for tracking, then raise it (512 or 1024) for mixing — low latency during recording, more CPU headroom for plugins later.
While in Preferences, enable Request sample rate and Request block size. Otherwise REAPER follows whatever the last application set, and that unpredictability wastes hours.
Fix the Click-Drag Confusion for Media Items First
Several defaults in REAPER prioritise compatibility over convenience. Changing them early prevents frustration that accumulates subtly over weeks.
- Mouse modifiers for media items. By default, clicking the lower half of an item selects it; clicking the upper half moves it. Change this in
Preferences → Mouse Modifiers → Media item → left dragto marquee select on the upper half instead, or disable the split entirely. You'll stop accidentally nudging clips while trying to select them. - Zoom behaviour. The default horizontal zoom centres on the edit cursor. Switch it to centre on the mouse cursor in
Preferences → Editing Behaviour → Horizontal zoom centre. Zooming where you're looking, not where the playhead last stopped, is faster. - Peak display gain. Waveform peaks display at 0 dB by default, which makes quiet recordings look like flatlines. Increase peak display gain to 6–12 dB in
Preferences → Appearance → Peaks/Waveformsfor visual feedback that reflects what you hear. - Backup path. REAPER auto-saves timestamped backups, but the default path is buried. Set a dedicated folder in
Preferences → Project → Project savingand set the interval to every 5 minutes. Disk space is cheap; re-recording a lost take is not.
Workflow: Recording and Comping a Vocal from Start to Finish
A vocal tracking session in REAPER rewards setup before performance. Here's a complete path from empty project to finished comp, using takes, lanes, and folder processing.
- Create a folder track named "Vox Bus". Insert a child track beneath it named "Lead Vox". Toggle the folder icon on the parent. This keeps all vocal processing on the bus while the child track holds raw takes.
- Set the recording input on "Lead Vox" to your microphone input. Enable record monitoring if your interface doesn't offer direct monitoring. Arm the track (red button).
- Record in takes mode. Set the record mode (right-click the arm button) to
Record: normal. EnableOptions → New recording that overlaps existing media items → Creates new media items in separate lanes. Sing the verse five or six times in a loop. Each pass appears as a lane beneath the previous one — no destructive overwrites. - Comping. Collapse lanes to a single track view. Swipe across the best phrases from each take; the selected segments automatically promote to the top comp lane. REAPER draws faint crossfades at boundaries. Adjust their length by dragging the fade edges if a breath cut sounds abrupt.
- Tuning and timing. Split a word that's slightly flat (press
Sat the start and end of the syllable). Hover over the item's top edge, holdAlt(orOption), and drag up or down to pitch-shift that segment by cents. For timing, holdAltand drag the item's right edge to stretch it without affecting pitch — REAPER's default elastique 3.3 Pro algorithm handles monophonic vocals cleanly for small adjustments. - Processing on the folder. Insert an EQ, compressor, and de-esser on the Vox Bus track. Because the folder sums all child tracks, the raw comp stays untouched on the child, and any processing changes affect only the bus output. To print the processed vocal non-destructively, right-click the folder track's record arm button, select
Record: output (stereo), and record the folder output to a new track.
This entire workflow took about ten minutes once the routing was in place. The folder setup pays off again when you double-track — add a second child track, record harmonies, and they automatically sum through the same processing chain.
Stop Recording at the Wrong Tempo Without Realizing
New REAPER users — especially those coming from other DAWs — trip over the same handful of things. The software doesn't prevent these; it assumes you know what you asked for.
- Recording with the wrong timebase. If you set a track's timebase to "Time" instead of "Beats (position, length, rate)" and later change the tempo, that track won't follow. Audio recorded to a click drifts out of sync. Check the timebase setting per-track in the TCP or in
Project Settings → Timebase for items/envelopes/markersbefore you start tracking. - Ignoring the ripple editing mode. Ripple editing (toolbar button with three states: off, per-track, all-tracks) controls whether deleting an item closes the gap. Beginners delete a section, don't realise ripple is on, and wonder why the rest of the arrangement shifted left. Get in the habit of checking the ripple state before any large deletion.
- Not naming tracks before recording. REAPER names recorded files after the track name. Record 12 takes on "Track 1" and your audio folder contains 12 files called "Track 1-001.wav" through "Track 1-012.wav". Rename tracks first — the recorded files inherit the name.
- Overloading a single project tab. REAPER supports multiple project tabs (
File → New project tab). Loading a full album's worth of songs into one project with markers separating them works, but it bloats memory and slows saves. One song per project tab keeps things responsive.
Plugins Scan but Stay Invisible? Here’s the Direct Fix
Even after you know the basics, REAPER's flexibility means certain problems recur predictably. Here are the ones that show up repeatedly in forums and user groups, with direct remedies.
Snag: Plugins scan but don't appear in the FX browser. REAPER may have blacklisted a plugin after a crash. Check reaper-vstplugins64.ini (in the resource path, found via Options → Show REAPER resource path) and remove the offending entry, or run Preferences → Plug-ins → VST → Re-scan → Clear cache and re-scan. For AU plugins on Apple Silicon, confirm the plugin runs natively — Rosetta-bridged AUs occasionally fail validation silently.
Snag: Audio playback crackles even with low CPU usage. This is almost always a block size issue or a driver problem. First, increase the block size in Preferences → Audio → Device. If crackling persists, check whether another application has claimed the audio device at a different sample rate. On macOS, open Audio MIDI Setup and verify only REAPER is using the interface.
Snag: MIDI notes record late or early. The input quantise setting in the track's recording menu may be active. Right-click the track's record arm button and confirm Track recording settings → Quantise track MIDI input is disabled unless you deliberately want it. Also check Preferences → Audio → Recording → Use audio driver reported latency — toggling this sometimes corrects an offset between your interface's reported and actual latency.
Snag: The mixer shows tracks in a different order than the arrange view. The Mixer and Track Control Panel have independent scroll and visibility settings. Right-click an empty area of the mixer and ensure Auto-link TCP/mixer scroll and Auto-link TCP/mixer visibility are both enabled. If you've hidden tracks in the TCP via the Track Manager (Ctrl+Shift+M), they'll also disappear from the mixer when visibility is linked.
Some users looking for a REAPER
Single binary — the same version installs for a soloist recording a vocal, a band tracking live, or an orchestra post-production session. No tiered editions.
- macOS 10.15 or later
- Apple Silicon and Intel Macs supported
Questions on file
What does the folder track system replace?
It replaces dedicated bus and aux track types. Any standard track becomes a group bus when you place it above other tracks and enable its folder button.
How many loopback audio channels can REAPER handle?
It supports up to 512 additional channels of loopback audio, which is used for routing internal application audio between programs on the same machine.
Is the software different for home studios versus professional facilities?
No. A single version is used across different user groups, from a soloist to an orchestra, without separate feature tiers.
Sign in · Create an account to add a field note.
No field notes yet. A measurement, a version, a machine — they appear after moderation.