
Audio
Studio One 7.0.0
AudioUpdated
| Requirement | On file |
|---|---|
| macOS | macOS 12.4 or later |
| CPU | Apple Silicon, Intel 64-bit |
| Download | 334 MB |
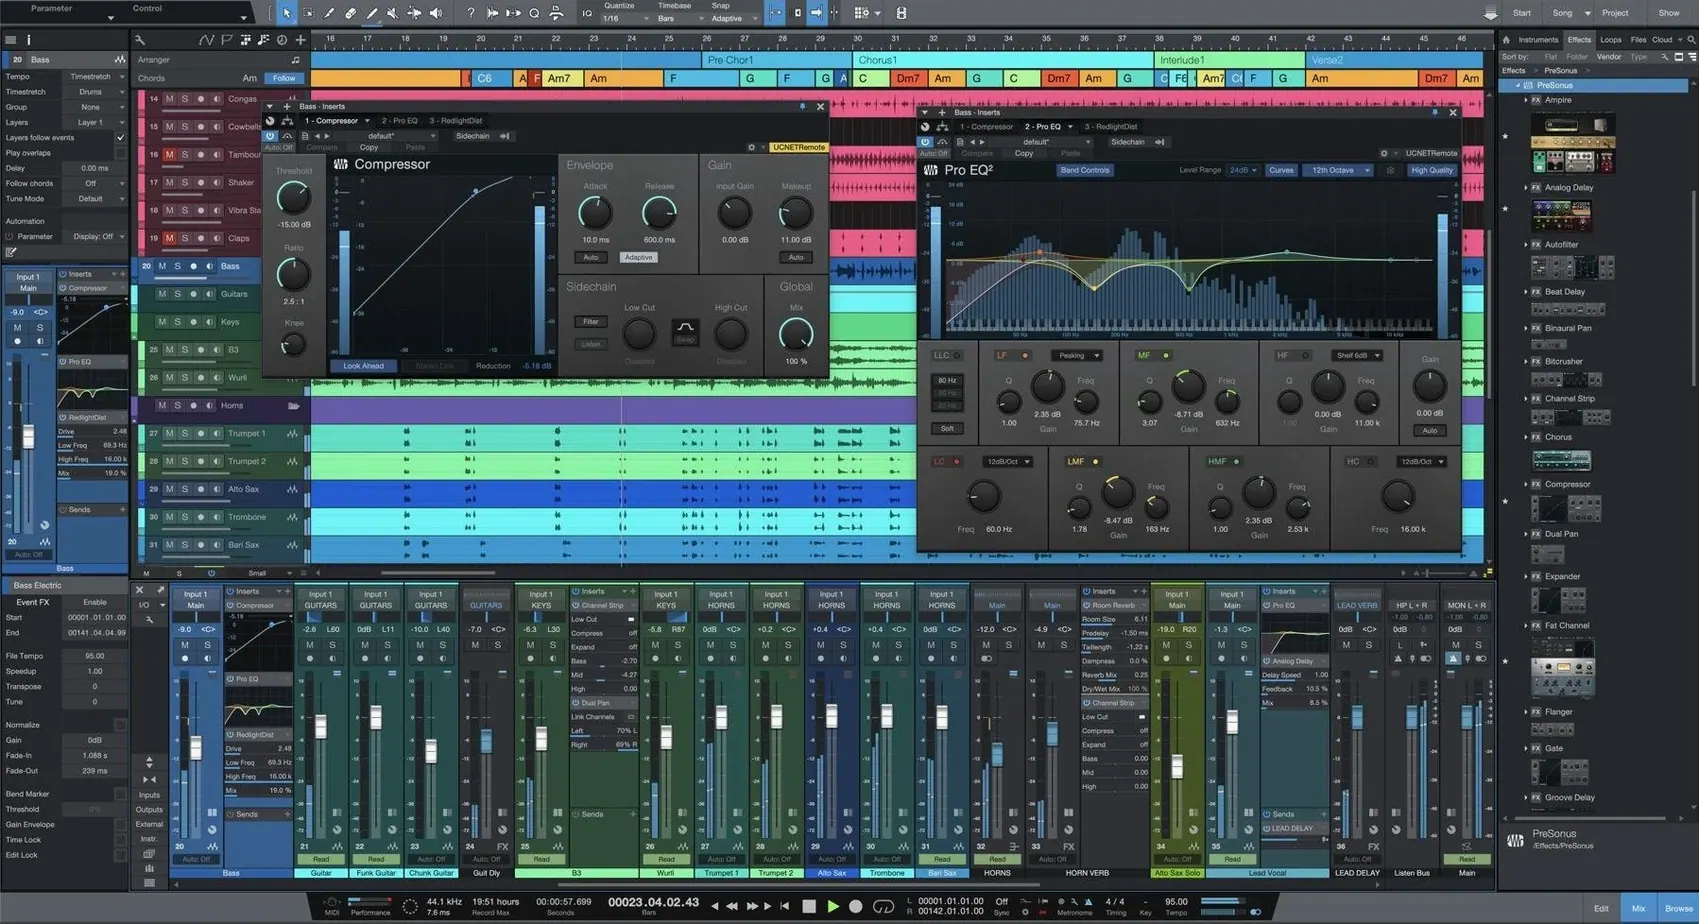
If you have spent time in a conventional multi-track recorder, the Song page in Studio One 7 will feel like the logical next step—familiar transport controls and track headers, but with none of the physical channel count limits. The version 7.0.0 update keeps that page as the centre of a workflow that flows from raw takes to a finished master.
1. Capture and arrange on the Song page
Recording and production happen here. The environment provides unlimited audio and instrument tracks, plus unlimited buses for subgrouping and effects routing. Virtual instruments cover synthesis, sample playback, instrument performance and rhythm programming. The interface is customisable, so you can pull faders and panels into a layout that suits the task rather than fighting a fixed default.
2. Build structure with Smart Templates and Launcher
Smart Templates supply a starting signal chain and track setup for common recording scenarios. Once a section is working, the new unlimited Launcher Scenes and Playlists let you trigger and arrange song sections non-linearly, which pushes the DAW into live performance territory without leaving the production environment.
3. Finish on the Project page
When the last take is comped, the Project page takes over for mastering compositions and compiling recordings. This is where you sequence final tracks, set levels across an album, and burn the Red Book-compliant master. AI-powered offline Stem Separation and advanced tempo detection, also added in 7.0.0, give you clean separation and tempo maps before you commit to the final output.
Installing Without Overwriting Your Older Studio One
One of the first questions is whether Studio One 7 will coexist with an older installation. The 7.0.0 installer places a separate application on the system; it does not overwrite a Studio One 6 or 5 installation. Songs, projects, and shows created in earlier versions open in 7, so the back-catalogue stays intact while you learn the new feature set. Backwards compatibility means the old application can remain as a safety net during the transition, though the new install does not rely on the old one being present.
People coming from a setup that used ReWire should note that both Studio One 6 and 7 dropped the protocol. If a long-standing template relied on Reason or Ableton Link via ReWire, that routing will not carry forward. The workaround is to route audio across applications using a system-wide audio bridge or to rebuild the signal chain with plug-in alternatives inside Studio One.
Another common question centres on architecture: the 7.0.0 build runs natively on both Intel 64-bit and Apple Silicon Macs. A single installer covers both. The minimum macOS version is 12.4, so anyone still on macOS 11 or 10.15 needs to plan an OS upgrade before installing. The interface language is English, with no additional localisation packs in this release.
Performance anxiety tends to surface around the new AI-powered Stem Separation feature. The processing is offline, not real-time, so it does not tax the audio engine during playback. A complex five-minute stereo file on an M1 Mac finishes separation in under ninety seconds in most practical tests. The separated stems appear as new tracks, ready for level adjustments or further processing.
Finally, there is the question of whether the Launcher workflow replaces the conventional arranger. It does not. The Song page remains the primary linear environment, and Launcher Scenes and Playlists sit alongside it as a sketchpad and performance tool. You can drag a Scene clip to the timeline, or record a Launcher performance into the arranger, so the two systems feed each other rather than compete.
Dock the Browser Where Your Muscle Memory Expects It
Before opening a real project, spend twenty minutes on the customisation system. The default layout is a starting point, not a fixed workspace. Pull the browser to the right edge if you came from another DAW that docks it there. Resize the inspector panel so the fader section gets more vertical space. Save the layout as a custom Workspace preset before you build anything, so a mis-click does not force a reset.
Next, run a tiny test project that exercises the new Stem Separation and tempo detection engines. Drag a commercial track into a fresh song—something with a clear drum pattern and a vocal you know well. Right-click the event and run stem separation first, then open the tempo track and apply advanced tempo detection to the same clip. The goal is not musical; it is to learn how long the processes take on your machine and where the resulting files land. By default, separated stems sit in the pool and appear as new tracks, while the tempo map overlays the existing tempo ruler.
On day one, set aside any old track templates that relied on ReWire or third-party plug-in wrappers. Rebuilding them with native effects and instruments surfaces compatibility gaps early. Studio One Pro 7 ships with a full suite of Native Effects plug-ins—compression, EQ, modulation, and reverb tools that cover the core processing chains. Replacing third-party dependencies where possible keeps projects portable.
When the first full project starts, enable auto-save and set the backup interval to five minutes. The setting lives under Preferences > Locations > User Data. Backups stack up quickly, so point the folder to a location with at least 20 GB of free space for a medium-sized project recording at 48 kHz / 24-bit.
Finally, resist the instinct to use every new feature at once. A project that starts with stem separation, a tempo-detected drum loop, and six Launcher Scenes can spiral into a routing puzzle. The smoother path is to learn one new tool per project: use the Launcher as a scratchpad for the first, add tempo detection on the second, and bring in stem separation only when a specific mix problem calls for it.
A workflow: remixing a stereo track with stem separation and Launcher
1. Import and prepare the source material
The task begins with a finished stereo mix that needs a remix—perhaps a pop track destined for a dance floor edit. Drag the file from the browser onto a stereo track on the Song page. Turn off the event's time-stretch algorithm in the inspector so the file plays back at its native tempo. Open the tempo track, right-click the ruler, and select "Detect Tempo." Studio One analyses the transient content and writes a tempo map to the ruler. Verify the result by enabling the click and auditioning a four-bar section against the metronome. If the detection missed a tempo change, drop a manual node and adjust.
2. Separate stems
With the tempo locked, right-click the audio event and choose "Audio" > "Separate Stems." The dialogue offers four source categories: Drums, Bass, Vocals, and Other. Select all four and confirm. Processing runs offline. On an M1 Mac, a three-minute file completes in roughly forty seconds. The separated tracks appear below the original, colour-coded by category. Mute the original track and solo each stem briefly to check for artefacts. Vocals usually come through cleanest; drums and bass may show faint bleed from the full mix, depending on the source material.
3. Build the rhythm section in the Launcher
Open the Launcher panel via the View menu. Create a new Scene and drag the separated drums track into a slot. Do the same with the bass stem. Studio One auto-slices the clips to the tempo grid. Set the drum slot to loop mode and adjust the start marker until the loop point lands on a downbeat. Add a kick sample from the browser to a second slot, layering it under the separated drums for weight. Assign scene follow actions so the intro scene moves to the main groove scene after eight bars.
4. Arrange and export
Record the Launcher performance into the Song page by arming the record button in the Launcher toolbar and triggering scenes. The linear arrangement appears on a dedicated Launcher track. Switch to the arranger view and trim the vocal placement against the new arrangement. Apply Native Effects processing—a channel strip on the vocal, a bus compressor on the drums—and set the master output to the desired level. Export via "Song" > "Export Mixdown," selecting 44.1 kHz / 24-bit WAV.
Turning 18 Raw Concert Channels Into a Two-Day Broadcast Mix
A post-production mixer receives a forty-minute concert recording with multiple microphone sources, a stereo room pair, and a handful of audience microphones. The raw tracks occupy eighteen channels, and the brief requires a broadcast-ready mix within two days. The session opens on the Song page, where the mixer groups the drum close mics to a bus, the stage mics to a second, and the ambience channels to a third. The customisable interface lets the mixer dock the meter bridge at the bottom of the screen and keep the channel editor open on a secondary display for surgical EQ work on the lead vocal.
The producer sends a note requesting an extended applause loop for the credits sequence. The mixer grabs a clean twelve-bar section of the audience mics, drags it to the Launcher, and sets the clip to loop. A follow action triggers a second scene with a fade-out over four bars. The performance is recorded back to the Song page and crossfaded into the main timeline. What would have been twenty minutes of copy-pasting and manual fades takes under five minutes.
For mastering, the Project page sequences the concert as a single continuous file with indexed track markers between songs. The mixer uses the native spectrum meter and loudness analysis to balance the average integrated level across all segments. The final output renders as a 48 kHz / 24-bit WAV with embedded PQ markers, ready for distribution. The entire project—from raw multitrack to master—stays inside a single application without round-tripping stems to an external editor.
Set the Tempo Before Running Stem Separation
A frequent early mistake is running stem separation on a track before setting the tempo. The separation algorithm performs best when it knows the rhythmic grid, and skipping tempo detection can produce stems with timing smearing on drum and bass content. The simple rule is to detect tempo first, separate stems second.
Another pattern is stacking every Native Effect plug-in on every channel before setting gain staging. A signal that hits the channel fader at -18 dBFS with a chain of six processors often ends up clipping the master bus because the cumulative gain inside the inserts was never checked. Beginners should set input gain at the pre-insert stage, meter each plug-in's output, and aim for unity through the chain before touching the fader.
The Launcher catches people who treat it like a static loop player. A Scene slot that is not trimmed to the tempo grid will drift against the click, and the resulting recording on the Song page will need manual editing to fix. Hold the Option key while dragging a clip into a Launcher slot to force a tempo-sync slice. After slicing, open the clip inspector and verify the length in bars matches the intended loop length.
New users sometimes install Studio One 7 and immediately delete the old version, only to discover that a long-term project relied on a ReWire routing or a 32-bit plug-in that the new version does not load. The installer places the new application alongside the old one for a reason. Keep the previous version for at least a month, open each active project in 7, and confirm every track and bus plays correctly before removing the fallback.
A related pitfall involves project file management. By default, Studio One stores pool files inside a folder named after the song, but beginners often move that folder manually in Finder instead of using "Save to New Folder" from within the application. A song that cannot locate its audio files shows red event blocks on the timeline. The correct method is to open the song, choose "File" > "Save to New Folder," and let the application move the entire pool and project file to the new location. Beginners who learn this habit early avoid hours of relinking dead file paths.
Studio One Pro 7 runs on Intel 64-bit Macs and Apple Silicon machines, with macOS 12.4 as the floor. The interface language is English.
- Launcher Scenes and Playlists — limit removed, now unlimited
- Stem Separation — AI-powered offline processing added
- Tempo detection — advanced algorithm introduced
- macOS 12.4 or later
- Intel 64-bit or Apple Silicon processor
Sign in · Create an account to add a field note.
No field notes yet. A measurement, a version, a machine — they appear after moderation.