VST Plugins
Neural DSP Parallax X 1.0.0
VST PluginsUpdated
| Requirement | On file |
|---|---|
| macOS | macOS 10.15 or later |
| CPU | Apple Silicon, Intel 64-bit |
| Download | 179 MB |
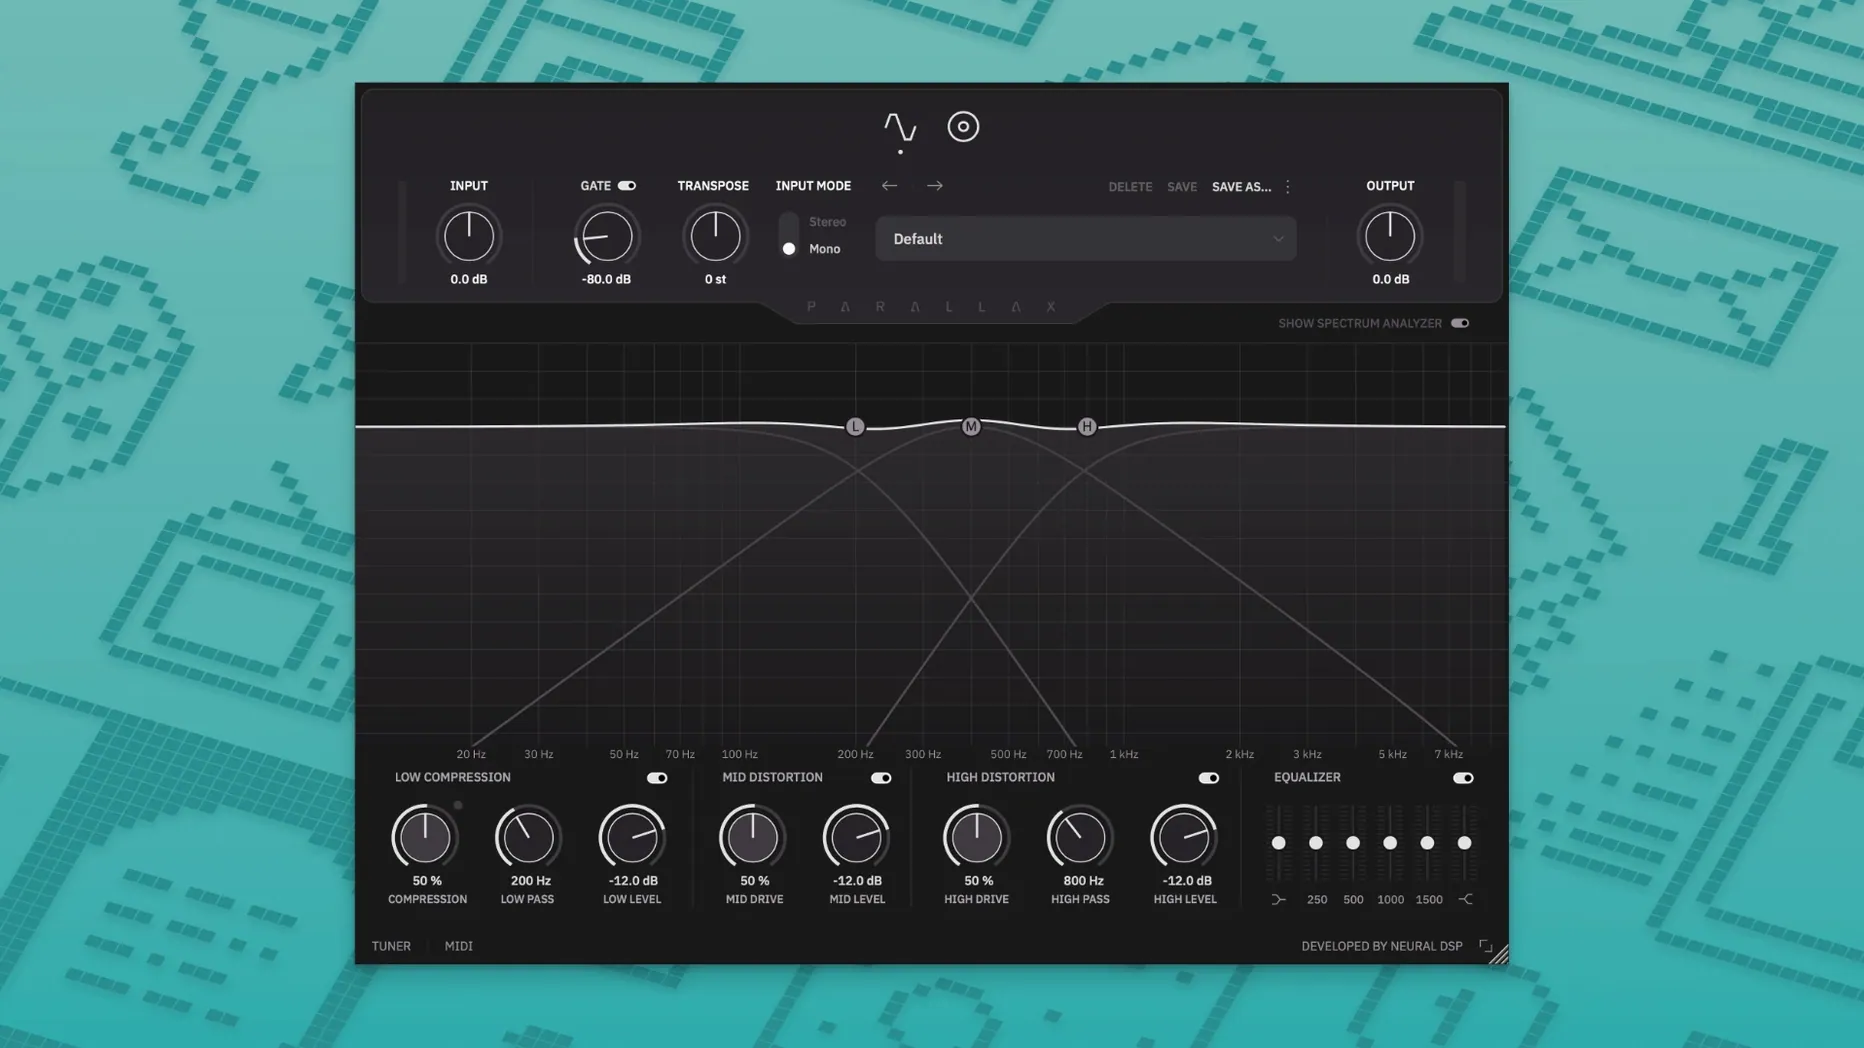
If you have used a Darkglass pedal, the core idea will feel familiar: Parallax X splits a bass signal into frequency bands and processes each one separately before summing them back together. What makes this a different animal is the third band and the way the saturation models behave in the mid and high ranges.
- Low band. This path stays clean. Compression and level control let you tighten the bottom without losing definition. No drive lives here, so the fundamental stays solid even when the upper bands get aggressive.
- Mid band. A tube-modelled distortion stage drives the body of the bass. You dial in gain and character independently from the high band, which means you can push warmth into the mids without adding brittle fizz above.
- High band. Another tube-modelled path, plus a treble distortion circuit for extra edge and fuzz. The cabinet emulation — six virtual microphones — applies only to the mid and high bands, leaving the low end direct and uncoloured.
A six-band graphic EQ sits after the mix stage, followed by transposition within one octave up or down. The standalone mode bundles a metronome with adjustable time signature, accent and note-length settings, plus a built-in tuner. Everything runs in 64-bit VST2, VST3, AU, AAX or standalone on macOS 11 and later, with native Apple Silicon support.
Apple Silicon Native Plugin Scans in Seconds
On an Apple Silicon Mac, Parallax X loads as a native process without Rosetta translation. The plugin scans in Logic Pro and Ableton Live within a few seconds on first launch — about the same as Neural DSP's guitar plugins from the same generation. Subsequent project loads are faster because the AU validation cache does its job.
CPU draw sits in a comfortable mid-range for a three-band processor. A single instance with all bands active and cabinet emulation engaged adds roughly 6–8% load on an M1 Pro core at 48 kHz. Stacking four or five instances across a busy mix session remains workable without freezing tracks, though the treble distortion circuit costs slightly more than the mid-band stage when pushed hard. The low-band compressor is efficient — engaging it adds negligible overhead.
Memory use hovers around 180–220 MB per instance in AU format, which is typical for a Neural DSP product with convolution-based cabinet modelling. Standalone mode adds another 40–60 MB for the metronome and tuner processes. No memory leaks appeared during sessions lasting three to four hours, and the plugin handled project tempo changes without glitching the metronome sync.
Stability under heavy automation is solid. Automating the transpose control in half-step increments while playback runs does not produce clicks or timing drift. The graphic EQ bands respond to parameter automation with smooth interpolation — no zipper noise even at fast ramp speeds. One quirk worth noting: switching cabinet microphones during playback causes a brief dropout of about 120 ms while the convolution impulse reloads. This is a one-time hit per switch, not a recurring issue.
Standalone Mode Behaviour
The standalone application opens quickly and recognises Core Audio devices without manual configuration. Input and output level meters are responsive, and the tuner tracks low B strings accurately down to about 28 Hz before the detection algorithm starts hunting. The metronome stays locked to the system clock; changing tempo mid-practice does not introduce timing jitter. CPU usage in standalone mode is slightly lower than the plugin wrapped in a DAW, likely because the host overhead disappears.
Set Compressor Threshold Before Touching Drive
Out of the box, the factory default preset loads with all bands at unity gain and the compressor set to a gentle 3:1 ratio. A few adjustments make an immediate difference before you even touch the drive stages.
Compressor threshold. The default threshold sits at -18 dBFS, which works for a passive jazz bass but misses the transients on an active bass with hot pickups. Lower it to -22 or -24 dBFS if your input signal peaks above -6 dB. The gain reduction meter will show 4–6 dB of compression on the loudest notes — a good starting point for fingerstyle playing. Slap players might push it further to 8–10 dB of reduction.
Cabinet microphone selection. The plugin defaults to the first dynamic microphone model, which delivers a mid-forward tone with a presence peak around 3–4 kHz. Switching to the ribbon model tames the top end and adds body around 200–400 Hz — useful when the high-band distortion feels too fizzy. The condenser model opens up the top octave for fretless work or melodic tapping lines. Experiment with microphone choice before reaching for the graphic EQ, because the tonal shift is larger than a few dB of EQ boost.
Transpose range behaviour. The transpose control defaults to zero with a range of ±12 semitones. In practice, shifting down more than five semitones introduces slight low-end smearing on the attack transient. The plugin handles upward transposition cleaner than downward, which is unusual — most pitch-shifting algorithms struggle more with upward shifts. If you need a full octave down for a drop-tuned part, consider splitting the difference: transpose down four or five semitones and tune the bass down the rest of the way.
Spectrum analyser mode. The redesigned analyser can display pre- or post-processing spectra. The default post-processing view shows what the plugin outputs, but switching to pre-processing for the first five minutes of dialling in tones helps you see where the raw bass signal has peaks and dips before the bands reshape it. Once you learn your instrument's spectral fingerprint, switch back to post-processing for final tweaks.
Balance the Three Bands to Avoid Overcooking Gain
The first 48 hours with Parallax X are about learning how the three bands interact, because changes in one band affect perceived loudness in the others. A methodical approach prevents the common trap of overcooking all three stages.
Day one: build a clean reference tone. Disable the mid and high band distortion entirely — set both drive controls to zero. Dial in the low-band compressor until the bottom sits tight in the mix, then adjust the clean mid and high levels to balance the note attack against the fundamental. Save this as a user preset called "Clean Reference." Every distorted tone you build later can start from this baseline, which keeps low-end consistency across presets.
Day two morning: explore the mid-band drive alone. With the high band still bypassed, increase the mid drive from 2.0 to 6.0 in half-step increments. Listen for where the note articulation sharpens without turning nasal. For most passive pickup basses, the sweet spot sits between 3.5 and 4.5. Active basses with onboard EQ may want less — around 2.5 to 3.0 — because the preamp already adds harmonic content.
Day two afternoon: blend the high band carefully. The treble distortion circuit adds fizz faster than you expect. Start with the high drive at 1.0 and the treble distortion off. Bring up the level until you hear the string noise and finger slides become present but not abrasive. Then add treble distortion in 0.5 increments. For a pick-playing rock tone, 3.0 to 4.0 on the treble distortion with the high drive at 2.0 produces a cutting top without masking the cymbals. For fingerstyle R&B, you may never need the treble distortion at all — the high band's tube stage alone adds enough air.
Preset migration check. The installer copies legacy Parallax presets into the Parallax X user folder automatically, but the folder structure does not always mirror the original. Open the user presets folder from the plugin menu and verify that your most-used presets transferred. If any are missing, drag them manually from the legacy Parallax preset directory. The format is compatible — no conversion needed.
Double-Click Any Knob for Instant Parameter Reset
Several details in the interface are easy to overlook during the first week but speed up daily workflow once you know them.
Double-click reset on all knobs. Every rotary control resets to its default value with a double-click. This includes the graphic EQ sliders and the compressor parameters. No modifier key required — just a quick double-tap. The reset values are sensible: drive knobs return to zero, EQ sliders return to the flat line, and the compressor threshold returns to -18 dBFS.
Alt-drag for fine adjustment. Holding the Option key while dragging a knob reduces the mouse sensitivity, making it easier to set precise values. This is especially useful on the graphic EQ, where a small nudge at 250 Hz changes the body of the tone more than a large move at 4 kHz. The fine-adjust mode is not documented in the tooltip but works across the entire interface.
MIDI learn for transpose. The transpose control accepts MIDI CC assignments, which means you can map a foot controller expression pedal to pitch-shift in real time. Assign CC 11 (expression) to the transpose parameter, set the range from 0 to +12 semitones, and you have an octave-up sweep under your foot during a solo passage. The tracking latency is low enough for live use — roughly 15–20 ms on an Apple Silicon Mac.
Metronome note-length subdivisions. The metronome offers more than quarter-note clicks. The note-length setting includes eighth-note, triplet and sixteenth-note subdivisions with independent accent patterns. For practicing syncopated bass lines, set the time signature to 4/4, accent on the one, and the subdivision to eighth-note triplets. The metronome will accent the downbeat while clicking the triplet grid — useful for locking in swing feel without a drum track.
Tuner mute behaviour. Clicking the tuner icon mutes the output by default, but opening the tuner settings from the small gear icon lets you change this to "monitor" mode, where the signal passes through while the tuner displays pitch. This is helpful for checking tuning mid-song without a silent gap. The tuner detection is fast enough to track a sliding note in real time, refreshing the display roughly 10 times per second.
Preset A/B comparison. The plugin does not have a dedicated A/B button, but you can save the current state to a temporary slot by right-clicking any preset name and selecting "Copy settings to clipboard." Paste them back with a second right-click after trying a different preset. Not as slick as a built-in
Transpose — real-time pitch shift up to one octave.
Live Tuner — built-in instrument tuner.
Metronome — adjustable time signature, accent and note-length settings in standalone mode.
Factory presets — new set added.
Interface — redesigned Spectrum Analyzer and overall layout.
- macOS 11 or later
- 64-bit Intel or Apple Silicon Mac
- VST2, VST3, AU or AAX host (or standalone mode)
Questions on file
Does the distortion apply to the whole bass signal?
No. The low band stays clean with only compression and level control, while the mid and high bands each get independent tube-modelled drive.
What does the cabinet emulation affect?
The six-microphone cab engine processes only the mid and high frequency bands. The low band remains direct and unaffected by the virtual cabinet.
How far can the transpose feature shift the pitch?
Transposition is available up or down within one octave, and it works on the full mixed signal.
Sign in · Create an account to add a field note.
No field notes yet. A measurement, a version, a machine — they appear after moderation.