VST Plugins
Sonic Academy KICK 1.1.8
VST PluginsUpdated
| Requirement | On file |
|---|---|
| macOS | macOS 10.13 or later |
| CPU | Apple Silicon, Intel 64-bit |
| Download | 358 MB |
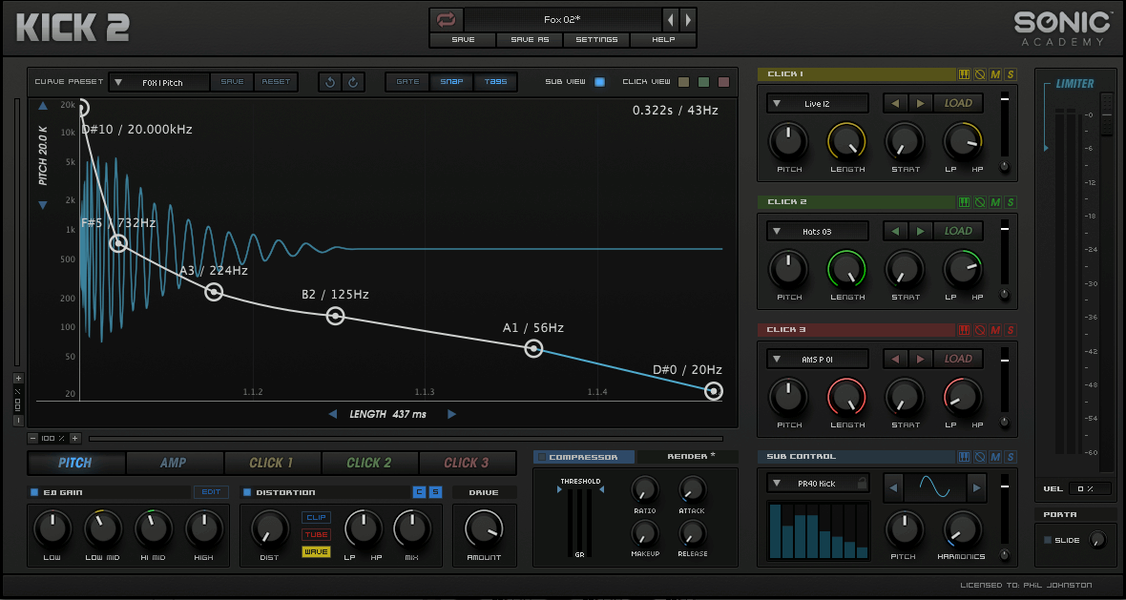
KICK is a dedicated kick drum synthesizer plugin with three click-shaping areas, built-in effects and a low-frequency oscillator.
Click — The initial transient layer. Three separate zones let you shape the very front of the kick from a soft thud to a sharp, pointed attack.Body — The main tonal and sub-weight section that defines the fundamental pitch and length of the drum.
Distortion — Three algorithms for adding saturation, from subtle warmth to full-on clipping, before the signal hits the output chain.
EQ & Compressor — A dedicated equaliser and compressor inside the plugin for further sculpting and dynamic control without leaving the interface.
Limiter — A final stage brick-wall limiter to catch peaks and set the maximum output level.
LFO — One low-frequency oscillator that can be routed to modulate parameters for moving, evolving kick textures.
First Days with KICK – Practical Setup Notes
After dropping the component file into your plug-ins folder and letting your DAW scan it, open KICK on a fresh MIDI track—not an audio track. The plug-in is a synth, so it needs MIDI note input to trigger. Load the default preset and draw a single C3 quarter note at bar one, then loop it. This gives you a clean starting point for hearing what each control actually does before you reach for the factory library.
The 230-plus presets are worth an hour of browsing, but do it methodically. Sort them by style rather than flicking at random. Group them into three mental buckets: short and tight (for fast tempos above 140 bpm), medium with body (your 110–135 bpm workhorses), and long 808-style sustains for trap and slower hip-hop. Auditioning this way builds a shortlist you'll actually return to rather than a blur of names you forget by the next session.
A habit worth forming early: always gain-stage the output before you start tweaking. KICK's internal limiter will catch peaks, but the synth itself can run hot, especially with the distortion section engaged. Set the main output knob to -6 dB with the limiter off, dial in your sound, then engage the limiter last. This stops you baking a clipped signal into a preset you'll later wonder why it distorts your channel strip.
Why Your Kick Won't Sound Above C2
No sound on playback. The most frequent cause is MIDI note range. KICK responds to a limited key range—typically C1 to A2 depending on the preset's tuning. If your MIDI clip sits at C3 or higher and nothing comes out, drop the notes an octave. The second culprit: the sub oscillator's amp envelope. If the decay is set to zero, the body of the kick disappears entirely. Check the amp envelope decay knob sits above minimum.
Click transient too weak or too aggressive. The three click-shaping zones interact, and stacking all three at once with high levels creates a spike that the compressor then grabs unnaturally. Instead, pick one zone as your primary transient and use the other two for subtle support—no more than 20–30% mix on the secondaries. If the click still feels detached from the body, shorten its decay slightly so it glues into the sub before the compressor stage.
Plugin validation fails in Logic Pro. On Intel Macs running newer macOS versions, the 64-bit x86 build occasionally fails AU validation on first scan. Close Logic, remove the component from /Library/Audio/Plug-Ins/Components/, re-add it, then open Logic holding Control to force a full re-scan. If that fails, run the terminal command auval -a to check whether the system sees the plug-in at all. The package instructions cover activation steps—skipping them is the other common reason for a non-functional unit.
Presets sound different from the demo. KICK presets are tuned to a factory reference pitch, usually C1 or D1. If your project key shifts the root note, the entire character of the kick changes. Check the sub oscillator's pitch offset in the body section and retune it to your track's fundamental. A 10 Hz shift in a sub-bass kick is the difference between chest resonance and a flabby thump.
How the Click Engine Split Into Three Editable Zones
Version 1.1.1 refined the click-layer engine from the original Kick by Nicky Romero release. The earlier version used a single click oscillator with limited waveform options; the update split this into three independently editable zones, each with its own amplitude envelope and filtering. In everyday terms, this means you no longer need to layer an external transient sample to get definition—the three zones cover the ground that previously required a separate sampler track.
The sub oscillator gained additional waveform shapes beyond the sine wave found in the original. Triangle and square-derived waveforms are now available, which changes how the body interacts with bassline tuning. A sine wave sits cleanly under a mix; the additional waveforms introduce harmonics that can clash with bass synths in the same frequency range. Users who upgraded noticed this immediately—a patch that sat perfectly in a mix on the old version might need EQ cuts around 80–120 Hz on the new waveforms.
The distortion section was also rebuilt with three distinct algorithms rather than a single saturation curve. One algorithm leans toward soft clipping, another toward hard digital distortion, and the third sits between them with a tape-like compression characteristic. The practical effect is that you can now push the body into audible harmonics without losing the sub weight, which the original version tended to hollow out when driven hard.
Unlock the LFO That Factory Presets Leave Dormant
Two settings affect every preset you load, and neither is touched by the factory library. First, the LFO routing depth defaults to zero on most presets—the oscillator runs but modulates nothing. If you want moving kick textures, assign it to pitch or click level at a depth of 2–5%. Above that, the kick detunes perceptibly and loses its impact. Second, the limiter threshold ships at 0 dB, which means it only catches overs. Pull it down to -1.5 dB and set the release to its fastest value. This shaves transients without squashing the body, a setting that works across genres.
The compressor's attack time is another global tweak. The factory default sits around 10 ms, which lets the initial transient through. For punchy house and techno kicks, try 3–5 ms instead—the compressor bites earlier and the click feels tighter. For slower material where you want the full transient to bloom, push it out to 20 ms and bring the ratio down to 2:1. These small shifts change the perceived loudness more than the output knob does.
If you work in a project with a tuned kick, lock the sub oscillator's pitch to key tracking off. KICK does not force key tracking by default, but some presets enable it. An untuned sub sliding across notes sounds loose and amateurish in a mix where the bassline is tightly tuned. Check the body section's pitch mode and set it to fixed unless you are deliberately designing a pitched kick pattern.
How KICK Fits with Other Apps and macOS Features
KICK works as an instrument plugin inside any AU or VST host running on Intel Macs. In Ableton Live, drop it into a MIDI track and use Live's built-in audio effects after the plugin instance—KICK's internal limiter handles peaks, but Live's Glue Compressor on the channel strip adds the final mix bus character. In Logic Pro, the plug-in responds to MIDI region automation for the sub pitch and click level parameters, which means you can draw pitch bends for 808-style slides directly in the piano roll without touching the plugin GUI.
macOS Audio Unit hosting means KICK also loads in non-DAW environments like Hosting AU or AU Lab, useful for sound design sessions where you want to sample the output without opening a full project. Route the output through BlackHole or Soundflower—both free virtual audio drivers for Intel Macs—to capture the processed signal straight into a recorder or sampler. This setup turns KICK into a standalone kick design station without a DAW running.
The plug-in's output sits happily inside a drum bus chain. A common routing: KICK on its own track, EQ cutting below 30 Hz and a gentle boost at the fundamental, then bussed to a drum group with light parallel compression. Because KICK handles transient shaping internally, you can keep the bus processing minimal—the transient decisions are already made before the signal leaves the plugin. This cuts down on the number of processing plugins needed downstream and keeps latency predictable on Intel machines that may struggle with heavy session loads.
For users grabbing a kick 2 vst free download mac to test the workflow, the plugin also exports its processed output cleanly for resampling. Bounce a few variations at different pitch values, drop them into a drum rack or sampler, and you have a custom kick library built from the same sound engine. This hybrid approach—designing in KICK, then playing back as audio—saves CPU on older Intel Macs that run hot with multiple synth instances active.
Kick 3 1.1.8 applies a maintenance pass from the developer, addressing minor glitches and refining background stability.
- macOS 10.13 or later
- Apple Silicon or Intel 64-bit processor
Questions on file
What is the difference between KICK and the earlier Kick by Nicky Romero version?
Sonic Academy KICK adds three click-shaping areas, three distortion algorithms, an EQ, compressor, limiter and an LFO over the original Kick by Nicky Romero plugin.
Sign in · Create an account to add a field note.
No field notes yet. A measurement, a version, a machine — they appear after moderation.