VST Plugins
Toontrack EZmix Bundle 3.2.2
VST PluginsUpdated
| Requirement | On file |
|---|---|
| macOS | macOS 10.13 or later |
| CPU | Apple Silicon, Intel 64-bit |
| Download | 977 MB |
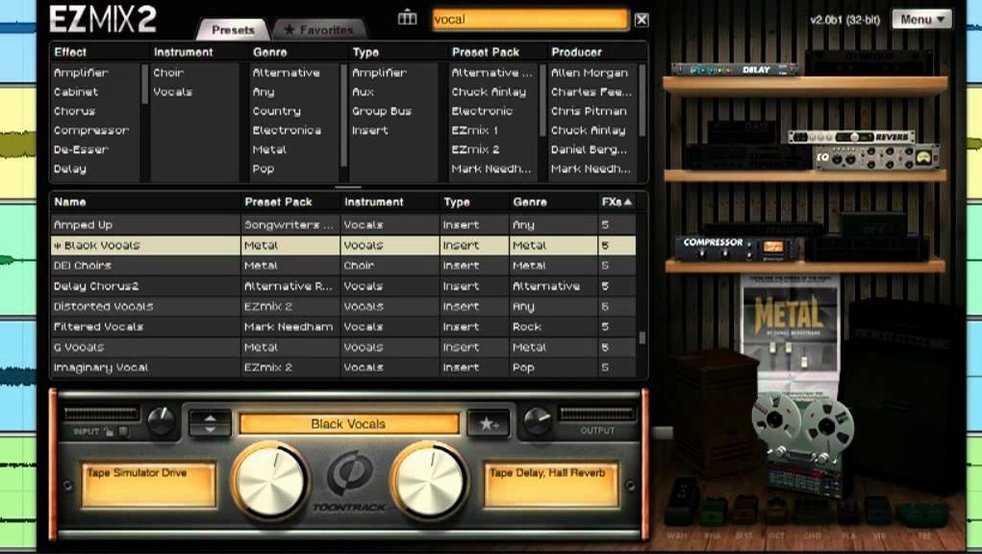
Version 3.2.2, released 2025-12-05, adds support for EZmix packs shipped from Q4 2025 onward. Earlier functionality remains intact: it still loads into a sequencer channel strip where you pick a preset to process audio, and it still carries amp and cabinet simulations alongside new reverb algorithms and mastering-style effects.
One Click to Polish Drums, Vocals, Guitars, Basses and Keys
- Individual tracks. Drums, vocals, guitar, bass and keyboards each have dedicated preset categories. Drop it on a kick track, audition a few options, and the chain adjusts internal gain, EQ and dynamics to match the source.
- Buses and subgroups. The mastering-derived presets suit drum bus glue or a vocal subgroup where you want a finished tone without stacking four separate plug-ins.
- Guitar practice. The independent host runs outside a DAW. Load an amp and cabinet preset, plug in, and play with processed tone and zero recording latency overhead.
Newer Preset Packs Demand Version 3.2.2 or Higher
- Preset packs released from the final quarter of 2025 require version 3.2.2. Older versions of the plug-in will not recognise them.
- This is a closed-architecture processor — you choose a preset and adjust a few macro controls. Individual compressor attack times or EQ band frequencies are not exposed.
Track While You Write and Hear a Near-Finished Sound Instantly
Songwriters tracking at home benefit immediately. The moment a vocal or acoustic guitar part is recorded, dropping EZmix onto the channel gives a near-finished sound while the arrangement is still taking shape. There is no break in creative flow to build processing chains from scratch. The preset categories map directly to common sources — kick, snare, lead vocal, rhythm guitar — so a writer who mixes as they go can stay inside the DAW and avoid the mental shift into engineering mode.
Guitarists who practise through a Mac get a different kind of value. The standalone host loads amp and cabinet simulations without requiring a full DAW session. Fire it up, select a preset, and the signal path is ready in seconds. This suits late-night practice through an audio interface when opening a project file feels like friction.
Content creators working to tight deadlines — podcast editors, video post-production people, anyone handing off mixes for social media — use EZmix as a speed layer. A spoken-word preset on a dialogue track cuts the time spent on EQ, compression and de-essing to a single dropdown selection. Consistency across episodes becomes easier when the same preset handles the same voice week after week.
Engineers in larger studios tend to use it for quick reference tones during tracking. Sending a rough monitor mix to a vocalist with a finished-sounding chain helps the performance. The real mix may replace it later, but during takes the psychology of hearing a polished sound matters.
Runs Natively on Apple Silicon Inside Logic Pro, Live, Cubase or Pro Tools
EZmix loads as an AU, VST3 or AAX plug-in, so it sits naturally inside Logic Pro, Ableton Live, Cubase, Pro Tools and any other DAW that supports those formats on macOS. On Apple Silicon machines it runs natively, which keeps CPU usage predictable inside Rosetta-free sessions.
The standalone application integrates with Core Audio directly. Select your interface in the audio preferences, and the processed signal routes to the selected outputs. No aggregate device trickery needed. The host respects the system sample rate, and switching rates from Audio MIDI Setup flows through without a restart.
With other Toontrack instruments — Superior Drummer, EZkeys, EZbass — EZmix shares a family-level preset architecture. Someone building a drum sound inside Superior Drummer can push the multi-out channels through EZmix instances on each kick, snare and overhead track, keeping the mixing vocabulary consistent. The toontrack ezmix bundle includes the core plug-in and a set of expansion packs, so the palette of chains spans more sources out of the box.
The plug-in also works with macOS accessibility features. VoiceOver reads the preset browser correctly, and the interface scaling follows system display settings. On a MacBook Pro with a notch, the standalone host window positions itself within the safe area automatically.
Arrow-Key Through Presets Over a Looping 4-Bar Phrase
- Audition presets with a loop. Set a 4-bar loop in your DAW, open the EZmix browser, and use the arrow keys to step through presets while audio plays. The switching is fast enough that differences between adjacent options become obvious immediately.
- Save favourites early. The browser includes a user favourites section. Any preset you return to more than twice belongs there. After a week, the favourites list becomes a personalised mixing palette.
- Test the wet/dry mix knob. Many presets respond well to parallel processing. Pull the mix back to 60–70% on a drum bus and the original transients poke through the processed sustain — useful for keeping punch while adding density.
- Check the input level indicator. The interface shows a small input meter. Red means the preset's internal gain staging is clipping. Pull the track fader down or insert a gain plug-in before EZmix. Clean input equals predictable output.
- Use the standalone host for tone-hunting. Before recording, open the standalone app and find a guitar or bass tone that inspires playing. Note the preset name, then recall it inside the DAW on the armed track. The tone stays identical.
- Match the pack to the project. Expansion packs target specific genres and sources. A metal-oriented pack will serve a heavy kick and snare better than the general-purpose library. Install only the packs relevant to current work to keep the browser manageable.
Workflow: vocal chain from raw take to demo bounce
This is a common path for a singer-songwriter who records a lead vocal and wants a finished-sounding bounce within ten minutes.
- Record the vocal take onto a mono track. Trim silence from the head and tail. Apply a light clip gain so the loudest phrase peaks around -6 dBFS.
- Insert EZmix on the track. Open the browser and select the Vocals category.
- Audition three presets labelled Lead Vocal. The first might add gentle saturation and a midrange push. The second could be brighter with more compression. Pick the one that sits the voice in the imagined final mix.
- Adjust the macro controls. Many vocal presets expose a single knob labelled Presence or Air. Turn it until the consonants cut through the instrumental without sounding brittle.
- Set the wet/dry mix to 100% for a full processed signal, or back it to 80% if the raw take needs some natural body to blend back in.
- Add a send to a reverb aux. EZmix does not include a reverb send control, so the aux track handles spatial placement independently. A plate or room preset on the aux suits most vocal chains.
- Bounce the track in place or export the region. The resulting file has EQ, compression, saturation and level control baked in — ready for sharing as a rough mix or stacking with additional production layers.
The same approach works for bass, acoustic guitar and keys. Swap the preset category, repeat the audition step, and the time from recording to usable bounce stays under a quarter of an hour. For users exploring ezmix 3 free download options to evaluate the plug-in, this vocal-to-bounce path is a practical first test that reveals whether the preset library matches a particular production style.
- EZmix pack compatibility — Support for packs released from Q4 2025 onward now requires version 3.2.2.
- macOS 10.13 or higher
- Apple Silicon or Intel processor
Sign in · Create an account to add a field note.
No field notes yet. A measurement, a version, a machine — they appear after moderation.